Welcome, Guest
Username: Password: Remember me

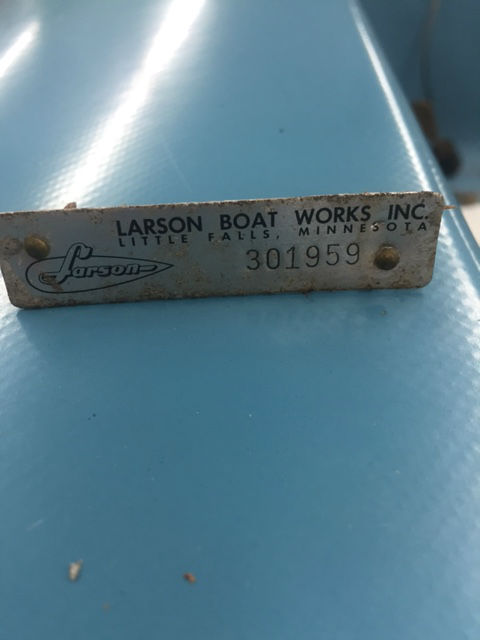
TOPIC: Larson Lapline All American
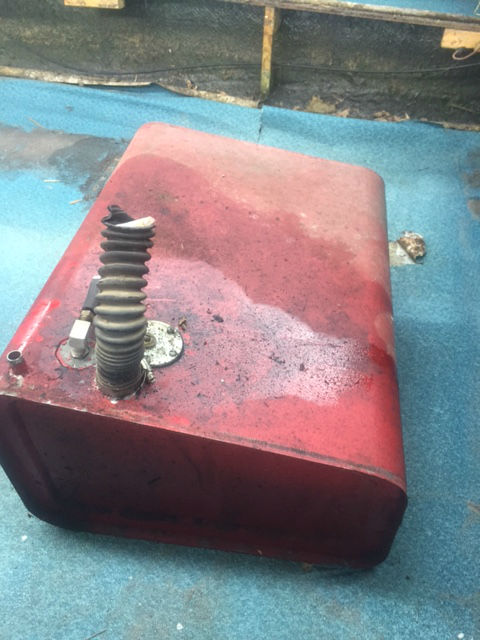
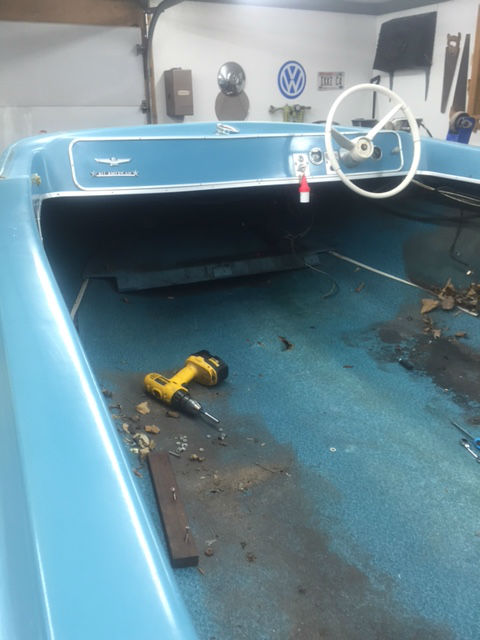
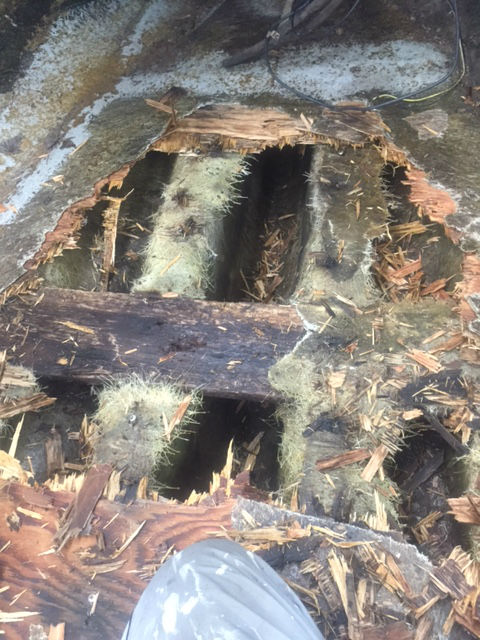
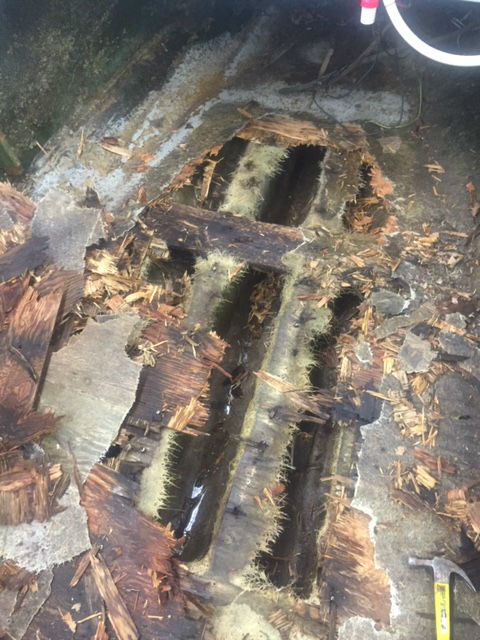
Re:Larson Lapline All American 8 years 1 month ago #119693

  • Drb007
  • Offline
  • Senior Boarder
  • Senior Boarder
  • Posts: 196
  • Karma: 4
  • Thank you received: 0
We finally have made some progress getting in to working on the Larson. It needs a new floor, so out come the seats, side rails, tank, vinyl, etc. The windshield will need to be replaced, as there are two large areas of cracking deep in the plastic, right in front of the drive and passenger. So that came out too. We ripped out a bit of the floor to see what is under there. HUGE fiberglass stringers. Now, in comparison to her Steury, which had one wooden stringer, a 1x4 on edge, this Larson has FOUR beefy fiberglass stringers, all pretty close to each other.
We will get the rest of the floor out this month, and then start on the repairs.
Now, we need advice on getting the steering wheel off. Tried a gear puller with no result. Don't think heat is a good idea. Thoughts?

Please Log in or Create an account to join the conversation.

Re:Larson Lapline All American 8 years 1 month ago #119694

  • Dr.Go!
  • Dr.Go!'s Avatar
  • Offline
  • Contributing Member
  • Contributing Member
  • Posts: 1719
  • Karma: 19
  • Thank you received: 125
I put tape around my steering wheel so I could soak the 1958 frozen wheel/shaft with PB Blaster. I let mine sit a few days...then a puller with pressure and then tap with "shock" pressure from a hammer. I got lucky. This may not be the best way to do it so I Welcome better ideas for you from other members. You really have to be careful not to damage a wheel you want to re-use...mine was already unusable so I had less at stake.
Dr.Go! (Mark)

Please Log in or Create an account to join the conversation.

Dr.Go!

Re:Larson Lapline All American 8 years 1 month ago #119695

  • 63 Sabre
  • 63 Sabre's Avatar
  • Offline
  • Contributing Member
  • Contributing Member
  • Posts: 4676
  • Karma: 147
  • Thank you received: 167
Quite a few different designs on those older wheels. Is it cable?
Time to get down and dirty, schootch under the dash on your back and check out how the pulley drum is attached. You might be able to remove a large nut, punch out a roll pin and then remove the drum. Some others like this one pictured have a large nut and keyway. Remove the nut (socket wrench) and pull off the drum. There might be some nut/bolt combinations that you can remove and pull the whole unit out with the shaft still connected to the wheel. Once out it's much easier to get the two stubborn parts separated.
Attachments:

Please Log in or Create an account to join the conversation.

Re:Larson Lapline All American 8 years 1 month ago #119697

  • Drb007
  • Offline
  • Senior Boarder
  • Senior Boarder
  • Posts: 196
  • Karma: 4
  • Thank you received: 0
Yes, it is a cable system. I am wanting to replace the steering system with a more modern shaft/rack system, as the cable s are cracked and aged. Alaina really likes the steering wheel, as it has some nice vintage character. I think I can salvage it with some epoxy work and a repaint.

Thank you both for your advice.

Please Log in or Create an account to join the conversation.

Re:Larson Lapline All American 8 years 1 month ago #119699

a tip from an old guy....in places like that, if you shine a bright flashlite on a hand held mirror, you can check to see what tools to take under there and check for wasp nests etc before you crawl under

Please Log in or Create an account to join the conversation.

Re:Larson Lapline All American 8 years 1 month ago #119709

  • Shake
  • Shake's Avatar
  • Offline
  • Gold Boarder
  • Gold Boarder
  • Posts: 982
  • Karma: 29
  • Thank you received: 6
Also when you install the new wood floor, use nails not screws, you or someone else will thank you for it down the road when it comes time to replace it....

Please Log in or Create an account to join the conversation.

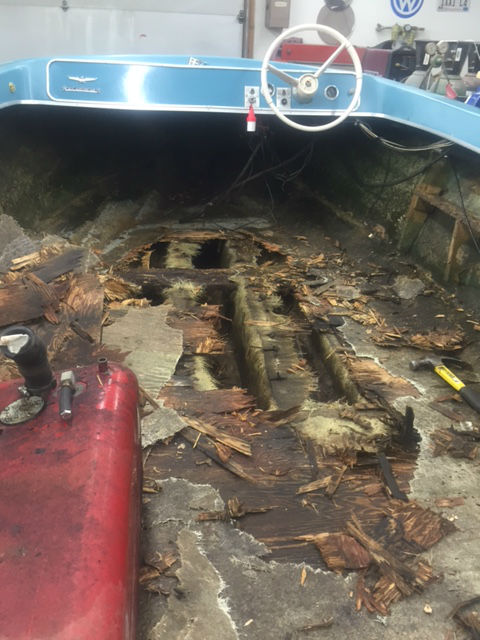
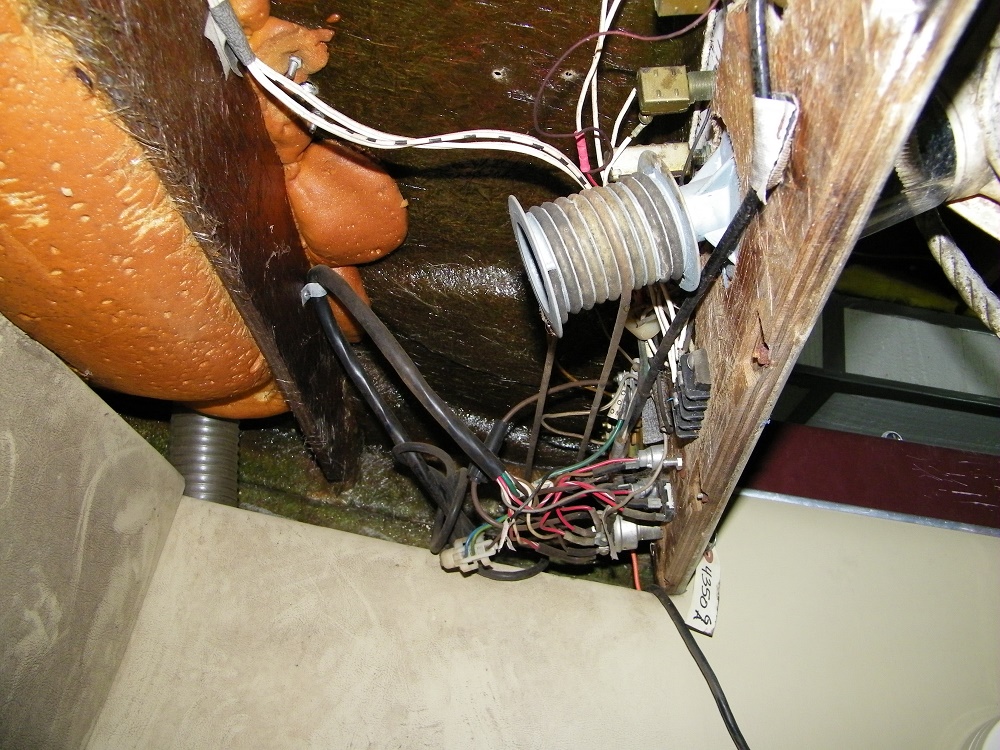
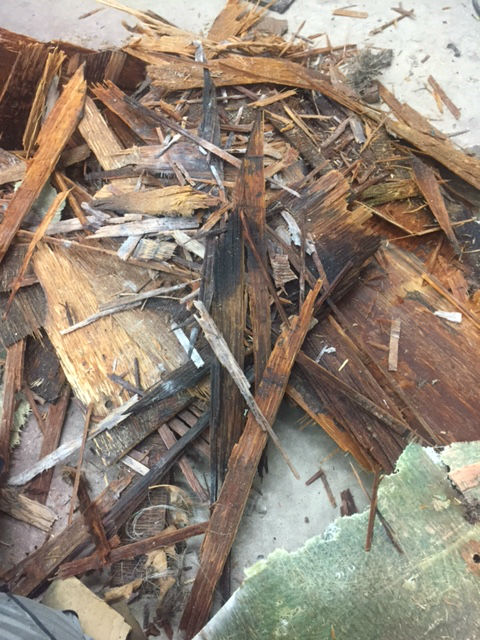
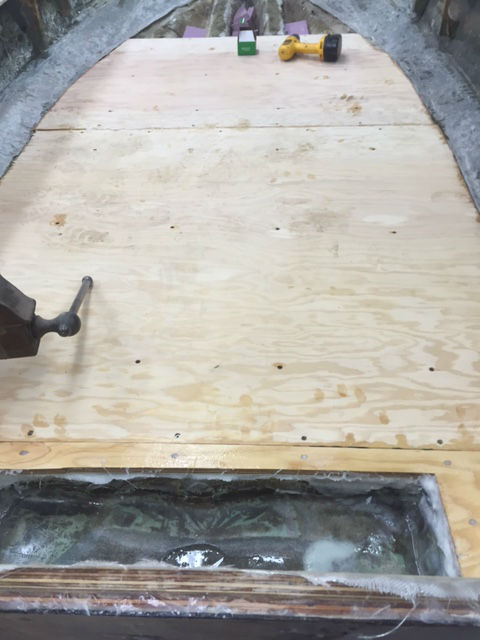
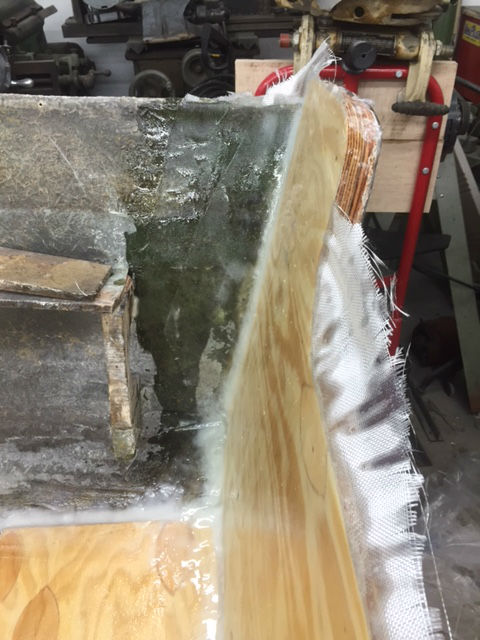
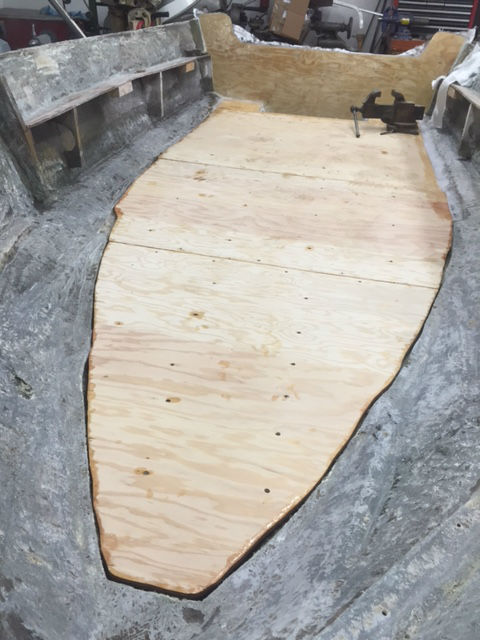
Golden Rule number one; While working in the bilge, absolutely under no circumstances, NO FARTING!!!! Captn Shake aka Joe.

Re:Larson Lapline All American 8 years 1 month ago #119714

Hmm nails for the deck into hollow fiberglass stringers?

Hows that of any holding strength to keep the deck down while whatever 'glue' cures?

A little PB blaster, some tension, and a good whack on tbe nut backed out to the end of the steering shaft eventually gets wheels free. Good luck

Please Log in or Create an account to join the conversation.

Re:Larson Lapline All American 8 years 1 month ago #119725

  • Drb007
  • Offline
  • Senior Boarder
  • Senior Boarder
  • Posts: 196
  • Karma: 4
  • Thank you received: 0
I'm confused about the nails. Can't see how that would work.
There were stainless steel screws in this mess.

Do I need screws at all? Can't I just PL it down?

Please Log in or Create an account to join the conversation.

Re:Larson Lapline All American 8 years 1 month ago #119735

  • MarkS
  • MarkS's Avatar
  • Offline
  • Moderator
  • Moderator
  • Posts: 5348
  • Karma: 118
  • Thank you received: 5
I've always considered stainless steel screws to be a good "back up" mechanical bond to (a) hold the deck in place while the chemical bond has a chance to cure fully, and (b) back up the chemical bond in case of failure.

You can also weight the floor down while it's drying, but better to have a backup. Just make sure you seal in and over the screws to prevent water infiltration.

Please Log in or Create an account to join the conversation.

Mark

Re:Larson Lapline All American 8 years 1 month ago #119736

  • 63 Sabre
  • 63 Sabre's Avatar
  • Offline
  • Contributing Member
  • Contributing Member
  • Posts: 4676
  • Karma: 147
  • Thank you received: 167
If you're going to use an adhesive I would suggest 3M 5200. It is a higher price but water impervious, will never break loose without ripping out your stringers. A few stainless or brass screws to hold it in place would draw the mating surfaces together during the cure. My opinion do not use regular construction adhesive but if it's a cost factor it'll work fine. A new floor no matter how you proceed will last many years of boating without problems. If you plan on living another 50 years and keeping the boat that long go with high end top of the line materials. If you just want a fun boat that will give you another 10 years of boating life you can use home depot materials without any problems. Some may disagree but it's my opinion (for what it's worth...witch ain't much)

Please Log in or Create an account to join the conversation.

Re:Larson Lapline All American 8 years 3 weeks ago #120388

  • Drb007
  • Offline
  • Senior Boarder
  • Senior Boarder
  • Posts: 196
  • Karma: 4
  • Thank you received: 0
We did a little more work today. We cut the fiberglass floor out, and then lifted the rotted plywood out. It was wet and rotten from the front to the back. It was so wet at the rear of the boat stern that I really began to question my plan of not doing the transom. Sure enough, with a less hopeful eye, I do see a bit of flexing. In fact, there is a crack in the splash well. I took the motor and transom trim off and drilled some holes...very wet wood. So, this just turned into a full restore. We started stripping everything, and hope to get the deck off this week. We will do the floor and transom, and then flip the hull to fix the keel and paint it. We will be happier in the end knowing that everything was done right.
Attachments:

Please Log in or Create an account to join the conversation.

Re:Larson Lapline All American 8 years 3 weeks ago #120389

  • 63 Sabre
  • 63 Sabre's Avatar
  • Offline
  • Contributing Member
  • Contributing Member
  • Posts: 4676
  • Karma: 147
  • Thank you received: 167
You have now become a full fledged member of the "replace the transom" club. Los of experienced members here to help ya out.
Of over 30 years of doing these oldies I have only found one that did not have a rotten arse and that is the one on my avatar....so I kept it :laugh:

Please Log in or Create an account to join the conversation.

Re:Larson Lapline All American 8 years 3 weeks ago #120400

  • Drb007
  • Offline
  • Senior Boarder
  • Senior Boarder
  • Posts: 196
  • Karma: 4
  • Thank you received: 0
Ugh, my aching hands. Anyone have a good trick for removing the rusty/corroded phillips screws from the rub rail? I have quite a few that just are stuck and none of my 20+ phillips drivers will catch. No luck drilling them out, so I've taken to chiseling from the left and right until they snap off. Not the most elegant method...

Please Log in or Create an account to join the conversation.

Re:Larson Lapline All American 8 years 3 weeks ago #120412

If you have a Dremel or something like it, take a cutting wheel and cut a straight slot in the head, in-line with one of the phillips slots then use a straight slot to try and get them out. Be careful not to cut into the rub rail with the wheel.

Bob

Please Log in or Create an account to join the conversation.

Re:Larson Lapline All American 8 years 3 weeks ago #120414

  • 63 Sabre
  • 63 Sabre's Avatar
  • Offline
  • Contributing Member
  • Contributing Member
  • Posts: 4676
  • Karma: 147
  • Thank you received: 167
Channel Lock type pliers, grip 'em and use the rounded head of the pliers as a fulcrum. If they're that bad they will either pull out or break, either way they're gone

Please Log in or Create an account to join the conversation.

Re:Larson Lapline All American 8 years 3 weeks ago #120422

  • Drb007
  • Offline
  • Senior Boarder
  • Senior Boarder
  • Posts: 196
  • Karma: 4
  • Thank you received: 0
Both good bits of advice, but I couldn't get either tool in there without marring the trim. So, I used a small chisel to knock the head of the screw side to side, and then was able to turn it out once I had loosened it (really just made the hole larger). Worked well enough.

Please Log in or Create an account to join the conversation.

Re:Larson Lapline All American 8 years 3 weeks ago #120423

  • Drb007
  • Offline
  • Senior Boarder
  • Senior Boarder
  • Posts: 196
  • Karma: 4
  • Thank you received: 0
Forward motion today, and validation that we made the right decision. I suspect the boat may have spent time at the bottom of Lake Michigan. That's the only way I can figure the transom would be so wet.
We got the deck off and hung up out of the way. The transom is all out, and we are ready to do some grinding. I want to share some pictures to invite advice based on what you see. This is our first restoration, and appreciate friendly advice and criticism.

As I understand it, I need to grind back the edge of the fiberglass floor to the hull, as well as the mat from the top of the stringers. We have some windy warm days forecasted this week, so I plan to bring it outside to make the mess.

Some thoughts:
Any reason to go up to 3/4" plywood on the floor? Seems like it would be a good idea, but I'm sure the 1/2" would be fine too...

As for foam, the boat had none. Can I reinforce the glass around the stringers well enough to make them near water/air tight? If so, then I'd see the benefit of the pour in foam. If not, I have seen some put foam into plastic bags/wrap or use polystyrene so as not to invite more water soaking over time. Thoughts?

Can I make the bilge bigger? I am going to put in a bilge pump, so I'd like a bit more room to do so.

Really appreciate the help!

Please Log in or Create an account to join the conversation.

Re:Larson Lapline All American 8 years 3 weeks ago #120424

  • Drb007
  • Offline
  • Senior Boarder
  • Senior Boarder
  • Posts: 196
  • Karma: 4
  • Thank you received: 0
Oh, and I found this!
Attachments:

Please Log in or Create an account to join the conversation.

Re:Larson Lapline All American 8 years 3 weeks ago #120425

  • Drb007
  • Offline
  • Senior Boarder
  • Senior Boarder
  • Posts: 196
  • Karma: 4
  • Thank you received: 0
And while I am thinking this process through, help me with this one.
The gel coat on the deck is blistering. There are a number of blemishes where the blister has popped and the gel coat bubble is gone, leaving a pit. There are a larger number of blisters. My concern is that this process will keep happening after we fix them and paint the boat. Any idea what causes this and how to keep it form being an issue?

In the areas where the boat is in "good" cosmetic condition, you can see the weave of the fiberglass under the gel coat. I assume that once I sand it down, epoxy seal it, and use sanding primer I will cover this up, yes?

Please Log in or Create an account to join the conversation.

Re:Larson Lapline All American 8 years 2 weeks ago #120481

  • Drb007
  • Offline
  • Senior Boarder
  • Senior Boarder
  • Posts: 196
  • Karma: 4
  • Thank you received: 0
Time to do some shopping. Menards is 10 minutes from home and sells 4x8 sheets of 3/4" marine fir plywood for $70, 5/8 for $60, and 1/2 for $50. They stock the 1/2 and 3/4, 5/8 is special order (4 to 7 days).

The original transom is 1 1/8" not counting the glass. So, I am thinking of "beefing up" the floor to 5/8 rather than 1/2, using a sheet of 5/8 and a sheet of 1/2 to get my 1 1/8 transom. I think I would need just the one sheet of 1/2", and no more than 3 (maybe only 2) sheets of the 5/8". So my total should be around $170-220, and my wife always has a coupon for Menards to at least save sales tax.

Does that sound like a decent plan?

Thanks,
Dave

Please Log in or Create an account to join the conversation.

Re:Larson Lapline All American 8 years 2 weeks ago #120588

  • Drb007
  • Offline
  • Senior Boarder
  • Senior Boarder
  • Posts: 196
  • Karma: 4
  • Thank you received: 0
We are going to use 1 1/2" pink polystyrene cut in strips to fill in between the stringers for some form of floation. We will finish grinding the glass, pressure wash everything out, and start cutting the floor and transom!

Please Log in or Create an account to join the conversation.

Re:Larson Lapline All American 8 years 1 week ago #120825

  • Drb007
  • Offline
  • Senior Boarder
  • Senior Boarder
  • Posts: 196
  • Karma: 4
  • Thank you received: 0
I got the transom template cut out. Just about ready to cut the plywood. My question is: How tight does the transom have to fit on the edges? To get it to sit flush up against the fiberglass on the transom, I had to trim the template up in a few spots along the bottom and sides to accommodate the variations in the hull. I have less than 1/2 inch at the most gap between the wood and the fiberglass around the edges. Is that ok? My understanding is that I will fill that with PB.

I ordered the West System products that I need that weren't in stock, and a sheet of 6oz glass from West that is 60"x 10 yards. I am hoping that is enough to do the boat? Sound about right?

While the guy at the marina was helpful enough, he did recommend that he wouldn't epoxy the floor, given that I am using marine plywood. He is of the belief that if wood gets past the epoxy then it is forced to sit in the wood and dry it out faster.

Everything I have read compels me to epoxy the underside, give it a single layer of glass on the bottom and then glass in the top.

Advice?

Please Log in or Create an account to join the conversation.

Re:Larson Lapline All American 8 years 1 week ago #120826

  • 63 Sabre
  • 63 Sabre's Avatar
  • Offline
  • Contributing Member
  • Contributing Member
  • Posts: 4676
  • Karma: 147
  • Thank you received: 167
On the transom I would cut to size and bevel the edges of the wood to fit the curve where the sides meet the back. There will be some gaps no doubt, nothing is perfect then fill those with the PB and then glass the entire transom inside making sure to run the cloth/mat around to mate up with the sides. When replacing some transoms that weren't quite square I would put PB along the edges before mating the new board to get a tight fit. Clamp it tight.

Please Log in or Create an account to join the conversation.

Re:Larson Lapline All American 8 years 1 week ago #120837

  • Kern
  • Offline
  • Junior Boarder
  • Junior Boarder
  • Posts: 105
  • Karma: 17
  • Thank you received: 1
The fit of the transom board at the bottom is not too critical. Any gap in that area can be filled with a resin/filler mixture to stiffen the bottom to transom corner. In replacing my transom board I made absolutely certain that the wood was totally encased in resin so water could not get at the wood. Areas to pay particular attention are where the drain holes and/or any motor mounting bolts penetrate the transom. My drains will be epoxyed into place and the motor bolt holes will have tubes epoxyed into the transom holes and the bolts will pass through the tubes.

A mixture I have used with good results is to mix sawdust with my resin. The wood fibers provide strength to the mixture in random directions, and, depending upon how thick you mix it, it can be used as a formable putty and stays in place while it sets up. I also use the microballoons mixed with resin for a putty like material. The microballoon mix is not as strong but can be mixed so it is less dense than water, thus providing some degree of positive bouyancy.

With either resin/filler mix, if you mix it heavy with filler and it is fairly dry, a coating of straight resin applied to the surface before placing the putty into place insures a good bond to the surfaces.

The mating area of the bottom of the motor well to the transom is also an area that can be strengthened to good effect. Glass cloth or random matt bonded into place on the bottom side of the motor well to the face of the transom will transfer a lot of the transom load into the bottom of the motor well. The load on the motor well is in tension rather than bending and will be spread over a large area of the rear structure.

By using some of these techniques, I have reinforced my transom area so it could probably take double the rated power for the boat, although I have no intention of using that much. I did it primarily to add durability to the structure.

Please Log in or Create an account to join the conversation.

Re:Larson Lapline All American 8 years 1 week ago #120844

  • Drb007
  • Offline
  • Senior Boarder
  • Senior Boarder
  • Posts: 196
  • Karma: 4
  • Thank you received: 0
Is the motor well the same as the splash well?

Please Log in or Create an account to join the conversation.

Re:Larson Lapline All American 8 years 1 week ago #120857

  • Kern
  • Offline
  • Junior Boarder
  • Junior Boarder
  • Posts: 105
  • Karma: 17
  • Thank you received: 1
I have never heard or used the term "splash well" and perhaps I am using "motor well" as the wrong term. The part of the boat I was referencing is the rectangular area in front of the motor. It has a bottom that is just a few inches below the top edge of the transom and would catch any backwash or waves that happened to get over the transom, thus preventing the water from getting into the boat cockpit.

Please Log in or Create an account to join the conversation.

Re:Larson Lapline All American 8 years 1 week ago #120858

  • Drb007
  • Offline
  • Senior Boarder
  • Senior Boarder
  • Posts: 196
  • Karma: 4
  • Thank you received: 0
OK, we are speaking of the same thing. I have only ever heard it called a splash well...as it where the water splashes into when stopping from speed, draining out the drain hole.

Thanks!

Please Log in or Create an account to join the conversation.

Re:Larson Lapline All American 8 years 1 week ago #120901

  • MarkS
  • MarkS's Avatar
  • Offline
  • Moderator
  • Moderator
  • Posts: 5348
  • Karma: 118
  • Thank you received: 5

Everything I have read compels me to epoxy the underside, give it a single layer of glass on the bottom and then glass in the top.

Advice?

That's the way I do mine, completely sealed on all sides. I usually use CSM on the underside and 1408 biaxial (several layers) on the top. Make sure the edges get plenty of resin to seal them up while installing, and try to avoid drilling holes to mount stuff like seats.

"Sacrificial Plates or Blocks" can be glassed to the floor - allowing you to screw into them if necessary for mounting. You can seal screw holes pretty well, but water eventually finds it's way in it seems.

Just my two cents, hope it helps.

Please Log in or Create an account to join the conversation.

Mark

Re:Larson Lapline All American 7 years 11 months ago #121704

  • Drb007
  • Offline
  • Senior Boarder
  • Senior Boarder
  • Posts: 196
  • Karma: 4
  • Thank you received: 0
More progress. We have had a lot of fun doing this project so far. We are using West System epoxy, and decided after talking to the West rep to use the slow hardener to give ourselves extra time. We laminated the transom and cross members with no issues. Installing the transom went great. In speaking with the West rep, we avoiding "over clamping" using block wedges along the bottom and bolts through the drain and motor mount holes. We used another sheet of plywood on the outside to ensure a nice flat clamp. It worked great, and the epoxy is some strong stuff! It is rock solid now, a huge improvement from where we started. It is a real piece of mind knowing that it is really sealed up against future water intrusion. We glassed in the transom with three layers of 6 oz glass. The floor is epoxy sealed and glassed on the bottom, and installed to the stringers with lots of PB. We have burned through two gallons of epoxy so far and I am picking up another gallon tomorrow. At $200/gallon I am really hoping one more gets this done. We still have to PB the edges of the floor and seal the top, then more glass. Once that is done we will flip the boat. We are planning on two cherry pickers, one on each end and 6 guys to carefully turn it over.

Please Log in or Create an account to join the conversation.

Re:Larson Lapline All American 7 years 11 months ago #121705

Very nice!

Please Log in or Create an account to join the conversation.

Re:Larson Lapline All American 7 years 11 months ago #121719

Excellent progress!!!!!!!!!!

Bob

Please Log in or Create an account to join the conversation.

Re:Larson Lapline All American 7 years 11 months ago #121730

  • 63 Sabre
  • 63 Sabre's Avatar
  • Offline
  • Contributing Member
  • Contributing Member
  • Posts: 4676
  • Karma: 147
  • Thank you received: 167
Like your choice of weight on the port stern. I've used concrete blocks, old tire rims etc.
Excellent work :laugh:

Please Log in or Create an account to join the conversation.

Re:Larson Lapline All American 7 years 11 months ago #121747

  • MarkS
  • MarkS's Avatar
  • Offline
  • Moderator
  • Moderator
  • Posts: 5348
  • Karma: 118
  • Thank you received: 5
I always felt like it was a major milestone when you got the floor put back in, keep up the good work!

Please Log in or Create an account to join the conversation.

Mark

Re:Larson Lapline All American 7 years 10 months ago #121869

  • Drb007
  • Offline
  • Senior Boarder
  • Senior Boarder
  • Posts: 196
  • Karma: 4
  • Thank you received: 0
I am amazed at how much epoxy we are going through. We got the transom and bilge area done, and went to glass the floor tonight. We got one layer down and realized we were going to run out of epoxy. So, it looks great, but we have just the one layer down.

So I am asking advice.

The West System rep says one layer is fine. He explained that the glass is just to keep the plywood from splitting,

The guy at my local marine store thought I was silly for glassing the floor at all, advising me to just epoxy the plywood and cover it with carpet (we are going to use marine vinyl to make it look more original).

So my question is, can I leave it as is? As I understand it, if I were to want to add the other layer I would have to sand the whole thing first since it will be dry by then.

Thoughts?
Attachments:

Please Log in or Create an account to join the conversation.

Re:Larson Lapline All American 7 years 10 months ago #121872

What weight cloth did you use? Up here in the NW we use cloth mainly to keep our fir plywood from checking (cracking) as it's prone to do. Not sure if you have fir plywood there, but if you do the one coat of epoxy and glass should do you fine. Looks like you have a nice thick coat of epoxy on there; just remember to wash and scrub the whole thing with a scotch-brite pad to remove the amine blush before you glue your vinyl down.

Please Log in or Create an account to join the conversation.

Re:Larson Lapline All American 7 years 10 months ago #121875

  • Drb007
  • Offline
  • Senior Boarder
  • Senior Boarder
  • Posts: 196
  • Karma: 4
  • Thank you received: 0
It is just 6 oz cloth.

Please Log in or Create an account to join the conversation.

Re:Larson Lapline All American 7 years 10 months ago #121876

Drb007 wrote:

It is just 6 oz cloth.


You should be fine to leave it as-is then.

Please Log in or Create an account to join the conversation.

Re:Larson Lapline All American 7 years 10 months ago #121893

  • Drb007
  • Offline
  • Senior Boarder
  • Senior Boarder
  • Posts: 196
  • Karma: 4
  • Thank you received: 0
I went out to check on the boat after the glass work dried over night. Man did we ever put the epoxy down thick. The areas that I feared last night were too thin I now see are what the finished product should look like. The areas I thought were good are thick with epoxy and smooth...no glass texture.
So, expensive lesson learned, to a point. My question is: how were were supposed to put the epoxy down the right way? Were tried a foam roller, and even though we had epoxied the plywood first, we seemed to just keep lifting the glass. I tried the metal West System roller and while it would help roll out bubbles, it didn't spread the epoxy. We ended up using a brush and our gloved hands. We got the glass pretty smooth, but again, way too much epoxy. I am assuming that we didn't hurt anything by using too much other than the budget, but I would certainly like to know how to do this correctly. I am going to go out tonight to sand the work we did last night and will add some strips of glass along the edge to reinforce that joint. I am considering putting one more layer of 6oz glass down since I already have it cut to size.
Thoughts?

Please Log in or Create an account to join the conversation.

Re:Larson Lapline All American 7 years 10 months ago #121895

Yeah, I could see from your photo that you put it down pretty thick...

I used to do epoxy/glass work like you did; thick and smooth. On my current project I decided to do it the "right" way. Pour the epoxy out, work it into the weave and the wood with a brush and then work the bubbles out with a laminating roller. Then once everything it saturated I took a squeegee and took off the excess, using it to advance my "wet edge" of epoxy further down the glass. It leaves you with the weave showing, which isn't a big deal if you're going to cover it with something else (carpet, etc) or if it's going to be hidden (stringers under a deck, for instance). You can put down a second coat to smooth things out later if you like, or use thickened epoxy, whatever you like.

Don't feel bad, it took me years to figure it out ;)

Please Log in or Create an account to join the conversation.

Re:Larson Lapline All American 7 years 10 months ago #121897

  • 63 Sabre
  • 63 Sabre's Avatar
  • Offline
  • Contributing Member
  • Contributing Member
  • Posts: 4676
  • Karma: 147
  • Thank you received: 167
I think you did a fine/excellent job. You have a floor far superior than when it was new. You can use it as a dance floor during those summer beach parties. Enjoy the fruit of your labor.

Please Log in or Create an account to join the conversation.

Time to create page: 0.459 seconds

Donate

Please consider supporting our efforts.

FG Login

Glassified Ads

1975 16ft Cobalt
( / Boats)

1975 16ft Cobalt
03-27-2024

Homelie/Bearcat
( / Engines)

noimage
03-17-2024

Thunderbird Apache 1956 hardtop
( / Boats)

noimage
03-10-2024

FiberGoogle

Who's Online

We have 7828 guests and no members online