Welcome, Guest
Username: Password: Remember me
  • Page:
  • 1

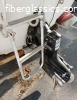
TOPIC: Evinrude head cleaning and painting

Evinrude head cleaning and painting 12 years 11 months ago #31771

  • Waterwings
  • Waterwings's Avatar Topic Author
  • Offline
  • Contributing Member
  • Contributing Member
  • Posts: 4885
  • Karma: 107
  • Thank you received: 100
OK, you know the deal if you read my other post about the Fat Fifty. I'm going to start a Fat Fifty Hot Rodding thread soon but didn't want you to have to wait for weeks from start to finish, so I'm going to ask for a little help here first.

These are the heads I got of E-bay to mill down.


Here they are after milling .125 off the compression side and cleaning off the old gasket


Three questions:
1) What should I use the clean up the coolant passages?

2) How should I clean up the outside, should I media blast them down to bare metal, self etch primer and paint or try and sand them down to the original primer and reprime with regular primer and paint?

3) What's the best primer and paint to use on the engine since it will gte hot and I need it to match the original paint?

Bob

Please Log in or Create an account to join the conversation.

Re:Evinrude head cleaning and painting 12 years 11 months ago #31774

Bob,

The heads look fine to me as they are - I wouldn't touch them. If you send them out to be blasted, the freshly milled surfaces could get scratched or dings in it. They will be fine. As for the water jacket covers - those could use a blasting job for sure. Blast them - don't use a wire cup on a drill, the flanges will get damaged. The original red primer OMC used was zinc chromate and is no longer available. TOXIC. Everything good for motors is toxic, it seems. Unless you have paint that can tolerate hot water without peeling away - I would leave them raw aluminum. If you paint them and the paint gives up - it will clof the water passages. If anybody knows of a block paint that will hold up for sure, I'd like to know about it. As for the outsides of the heads, nearly any old paint will do. Just scrub the heads down with hot water and dish setergent & let ehm fully dry. Then paint them with some decent rattle can paint that roughly matches the original. No sanding needed - afgter all, it's an engine - not a bow light. High temp paint is not needed - the heads won't get much more than 160 degrees. Just paint 'em.

Didn't you send these to some special place to mill them? Who ever did these had to do 5 passes per head on the finish cut. They must have a very small milling head. These may also have been cut on a CNC milling machine that is automated.

Heads are normally milled with a cutting head that's wider than the object to be cut. That way, only one pass is needed on the finish cut, and the milling marks are uniform across the head. The best milling jobs have virtually no cutting marks remaining on the last pass. The way these were done took a lot more time that's for sure. I'm sure they will be fine & I very much doubt they will have any problems, so just put them on & go. I've just never seen a set of heads milled this way before.

Below is a picture of a car cylinder head milled by an expert machinist. The surface is fresh milled, NOT sandblasted. A perfect finish.

Bruce
Attachments:

Please Log in or Create an account to join the conversation.

Re:Evinrude head cleaning and painting 12 years 11 months ago #31778

  • Waterwings
  • Waterwings's Avatar Topic Author
  • Offline
  • Contributing Member
  • Contributing Member
  • Posts: 4885
  • Karma: 107
  • Thank you received: 100
Bruce,
Thanks for the input. i have to admit I wasn't totally impressed but it was a local place. They're one of the only ones who do any milling I guess. i didn't want to have to ship them off somewhere and spend a bunch of money for the work and shipping. They charge $65/hr and it took a hour. I flipped one over real quick and sanded it on a sheet of 100 grit, on my cast iron tablesaw top. That's why one looks like the mill lines aren't as prominent as the other one. Thats also how I flattened/removed the gasket material that was left on the water jacket cover side.

Also looks like they may have used a slightly dull cutter. What you don't see but can feel is a sight edge around the combustion chamber side. Should I use a Dremel and stone to take the edge off?

I didn't mean to blast the whole head just the outside. Maybe temporarily bolt the covers on and blast the heads with the combustion side down?

Bob

Please Log in or Create an account to join the conversation.

Re:Evinrude head cleaning and painting 12 years 11 months ago #31808

I did notice that the right head appeared to be honed. Not sure you know it or not, but if you true a part by deck sanding it, it's important to move the part in a "figure 8" pattern only. This helps keep the part flat & reduces the possibility of removing too much materiaal on one side of it. Some machine shops have honing boards - these look like a large cutting board, but they are actually a special hone for large paralell surfaces. But you table saw will do just fine. Only remove what is needed - no more. If you feel a small ridge, hone the head in the figure 8 pattern till it is just level. Please don't use any file or power tool near the gasket surface or combustion chamber. If you have access to a blasting cabinet - go ahead & prep them as you wish. Remember to blow out all the passages & bolt holes with air after blasting. Then run a tap down all of the threaded holes to be sure those are clean. Wash it with hot soapy water & dry. Install the water jacket covers using a light film of Permatex "Ultra Gray" silicone on the gasket surfaces. Install the gaskets and the covers. Those little water jacket bolts don't need hardly any torque - just a few INCH pounds. Then the heads can be painted.

PS where is this "edge" that you mentioned? is it on the gasket surface or is it like a bent over part of the old gasket surface protruding into the combustion chamber?
OK OK I just looked at the PIC again - and it appears there is a "cornice" of aluminum protruding into the chambers. Yes - this flash must be removed. It will be easy, using a chisle for cutting wood. Firmly grasp the chistle near the cutting end with the bevel tip pointing away from you. Slowy pull the chistle BACKWARDS toward you and drag the cutting edge over the cornice. The chistle will scrape the aluminum away very easily - without removing too much. Don't slip!
Attachments:

Please Log in or Create an account to join the conversation.

Re:Evinrude head cleaning and painting 12 years 11 months ago #31818

  • Waterwings
  • Waterwings's Avatar Topic Author
  • Offline
  • Contributing Member
  • Contributing Member
  • Posts: 4885
  • Karma: 107
  • Thank you received: 100
Thanks for all the help it is greatly appreciated. thanks for reminding me about the figure 8 honing, don't want to screw these up after all this. I have to get some Permatex so I'll get the grey and I'm assuming I should use the Brown on the reed valve gaskets?

I also have to replace a couple of broken water jacket bolts. Looks like they were just grade 8 bolts. Since most have som rust on them thought I would just replace them all. Should I just use the grade 8 again?

Bob

Please Log in or Create an account to join the conversation.

Re:Evinrude head cleaning and painting 12 years 11 months ago #31821

No need to use " high tensile alloy screws " for this aplication !
1/4-20 stainless torqued to 80-inch lbs works just fine.

Please Log in or Create an account to join the conversation.

Re:Evinrude head cleaning and painting 12 years 11 months ago #33269

  • Waterwings
  • Waterwings's Avatar Topic Author
  • Offline
  • Contributing Member
  • Contributing Member
  • Posts: 4885
  • Karma: 107
  • Thank you received: 100
Sorry it's been a while, was out of town for a week and Daughters graduation from college, so hadn't had much time for the projects. Should get cleared by Doc tomorrow to get back at it hard and heavy.

I was able to hone the heads and clean them up with soap and water. Here's a pic of them honed.

There are some lines still. I ran a micro-dial indicator over them and they only read about .001 deep from what I can tell. With the gasket and two coats of Aluminun paint on each side it should be ok shouldn't it?

Bob
Attachments:

Please Log in or Create an account to join the conversation.

Re:Evinrude head cleaning and painting 12 years 11 months ago #33273

For cleaning of carbon, rust, scale, etc from an ALUMINUM head... you can't beat cheap dollar-store OVEN CLEANER. If the chambers are particularly carboned- use name brand (Easy-Off). Don't let it sit more than a minute at the most before rinsing. If the oven cleaner dulls the gasket surfaces, you can use the sandpaper-on-glass process again.

Once rinsed off- the surface needs no further prep unless you handled them with greasy fingers. Just use high-pressure air to blow-dry any moisture.

I prefer using single-stage POLYURETHANE epoxy as a finish coat on engines. I have painted hundreds of car-engine with it and it works well, and holds up just fine.

Ray

Please Log in or Create an account to join the conversation.

Re:Evinrude head cleaning and painting 12 years 11 months ago #33276

  • Waterwings
  • Waterwings's Avatar Topic Author
  • Offline
  • Contributing Member
  • Contributing Member
  • Posts: 4885
  • Karma: 107
  • Thank you received: 100
Ray,
Thanks I think I still have some oven cleaner left over from cleaning the inside of the mid section. My comment on the paint was for two coats on the head gasket each side before putting them on.

Bob

Please Log in or Create an account to join the conversation.

  • Page:
  • 1
Time to create page: 0.208 seconds

Donate

Please consider supporting our efforts.

FG Login

Glassified Ads

Gator 9" wheels Wanted
( / Wanted)

noimage
04-24-2024

1969 Stern Craft Boat 19'
( / Boats)

1969 Stern Craft Boat 19'
04-08-2024

‘62 Dorsett Catalina
( / Boats)

‘62 Dorsett Catalina
04-08-2024

FiberGoogle

Who's Online

We have 6437 guests and one member online