Welcome, Guest
Username: Password: Remember me
  • Page:
  • 1

TOPIC: 1963 Mercury 850 – Distributor Rotor Movement

1963 Mercury 850 – Distributor Rotor Movement 6 days 5 hours ago #149727

I have a 1963 Mercury 850 (85 HP inline-six, serial #1625438) with a dual-point ignition system.

While checking the ignition timing, I noticed I can rotate the distributor rotor approximately 90° by hand while the distributor belt and pulley remain stationary. The rotor moves smoothly with very little resistance until it reaches a mechanical stop in either direction.

Is this amount of rotor movement normal for this distributor, or does it indicate a problem? I'm trying to determine whether this is part of the advance mechanism or something that needs repair.

Any information or service documentation would be appreciated.

Please Log in or Create an account to join the conversation.

1963 Mercury 850 – Distributor Rotor Movement 5 days 14 hours ago #149728

  • ed-mc
  • Offline
  • Platinum Boarder
  • Platinum Boarder
  • Posts: 1482
  • Karma: 235
  • Thank you received: 131
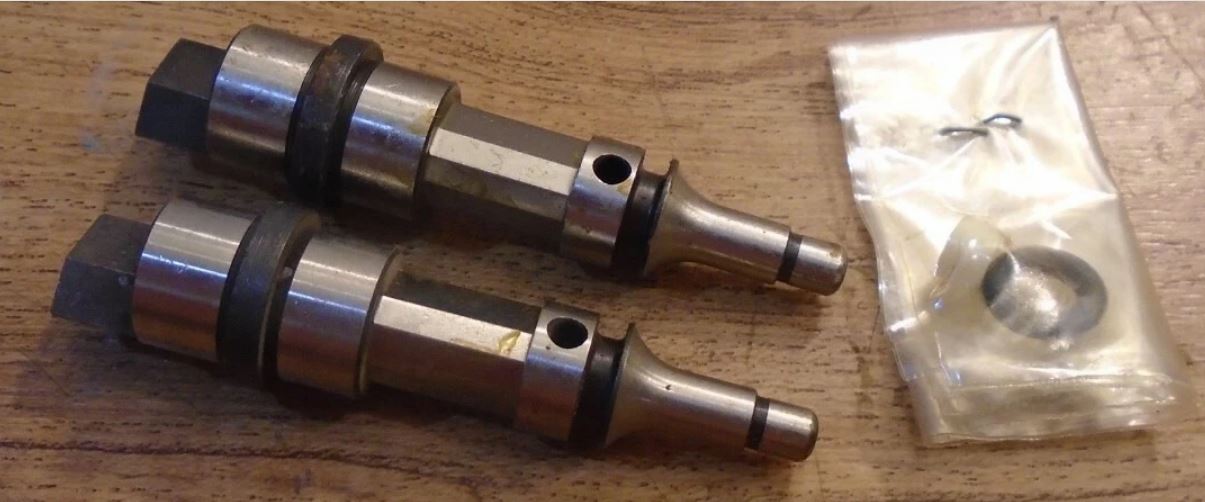
Hi, this is normal. If you'll take a look at the 40573 distributor shaft below, you'll see there's a tang in this upper shaft. It engages the points cam shaft, which has a similar tang. Note that on a Full Gear Shift model, the engine is only ever rotating clockwise, as viewed from the top of the engine. The distributor only ever rotates clockwise, as well.

This shaft is a throwback to the old Direct Reversing "Dockbuster" days. To effect a change in engine timing, in order for the engine to start and run CCW for Reverse (!), the tang in the distributor is designed to be part of that effort.

So, in forward, the breaker shaft is driven clockwise by the distributor shaft. When you stop the engine and move the controls towards reverse, then crank the engine, the distributor tang moves in the opposite direction until it hits the breaker shaft tang again, other side. This big shift in engine timing is, in part, what causes the engine to start and run in Reverse. Besides a bi-directional starter and very special control box. A 2-stroke don't care what way it's running, as long as the engine timing is correct.

Amazing those Merc Engineers figured that all out, it would seem to be an engineering nightmare! But they made it work!

To save $$$, no doubt, they re-used the same shaft in the FGS engine, knowing it would operate just fine being driven clockwise all the time. And think of the $$$ they did save, not having to design and build a new, one-piece shaft!

So even if you were to pull the flywheel of your 850 backwards (not a great idea for used impellers, which could break being moved the opposite way after taking a set), as soon as you crank the engine and the distributor moves, the dist. shaft tang hits the tang on the breaker shaft, and Voila'! it's self-aligned and ready to go.

So don't be concerned, it's supposed to be that way, On Poipoise! HTH..........ed
Attachments:

Please Log in or Create an account to join the conversation.

1963 Mercury 850 – Distributor Rotor Movement 5 days 14 hours ago #149729

  • ed-mc
  • Offline
  • Platinum Boarder
  • Platinum Boarder
  • Posts: 1482
  • Karma: 235
  • Thank you received: 131
I found a really good pic of the distributor breaker shaft on eBay. Note the special angles on the drive tang and how they would contact the distributor drive shaft tang. Pretty cool, eh!!
Attachments:
The following user(s) said Thank You: rigsha97

Please Log in or Create an account to join the conversation.

1963 Mercury 850 – Distributor Rotor Movement 5 days 1 hour ago #149730

Great through answer!!!! Thank you, I have this motor, didn't run when i got it. Little bit of everything wasn't "right" After doing some work on the points, idle went way too high, so i am trying to re-time motor. Thanks!!

Please Log in or Create an account to join the conversation.

1963 Mercury 850 – Distributor Rotor Movement 5 days 41 minutes ago #149731

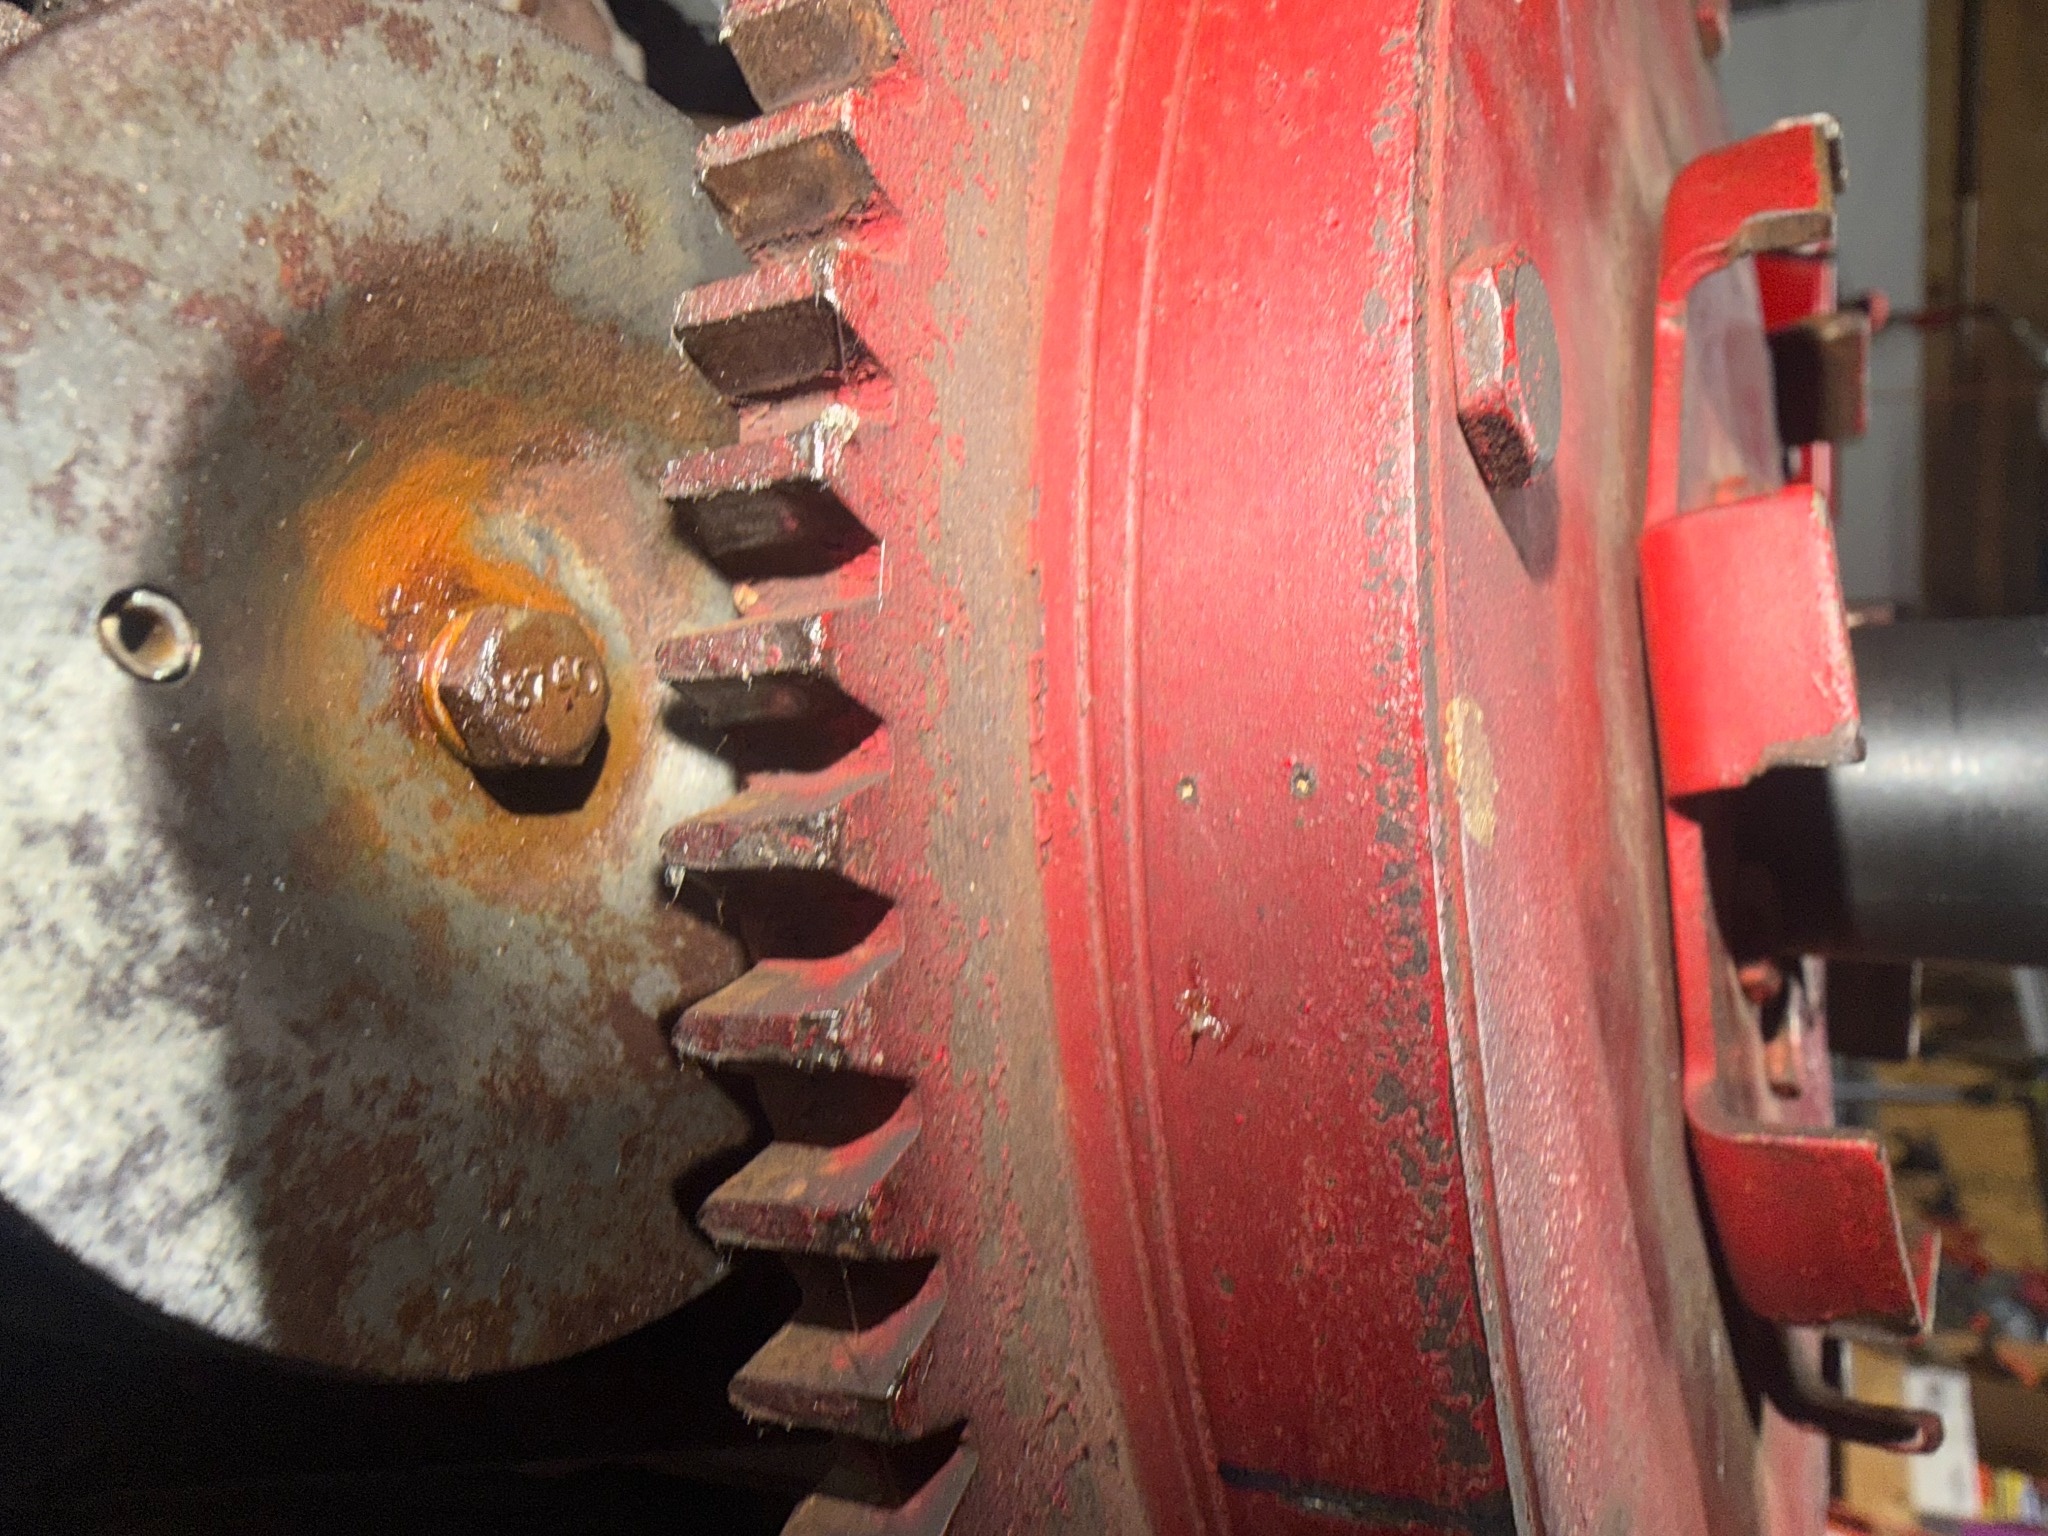
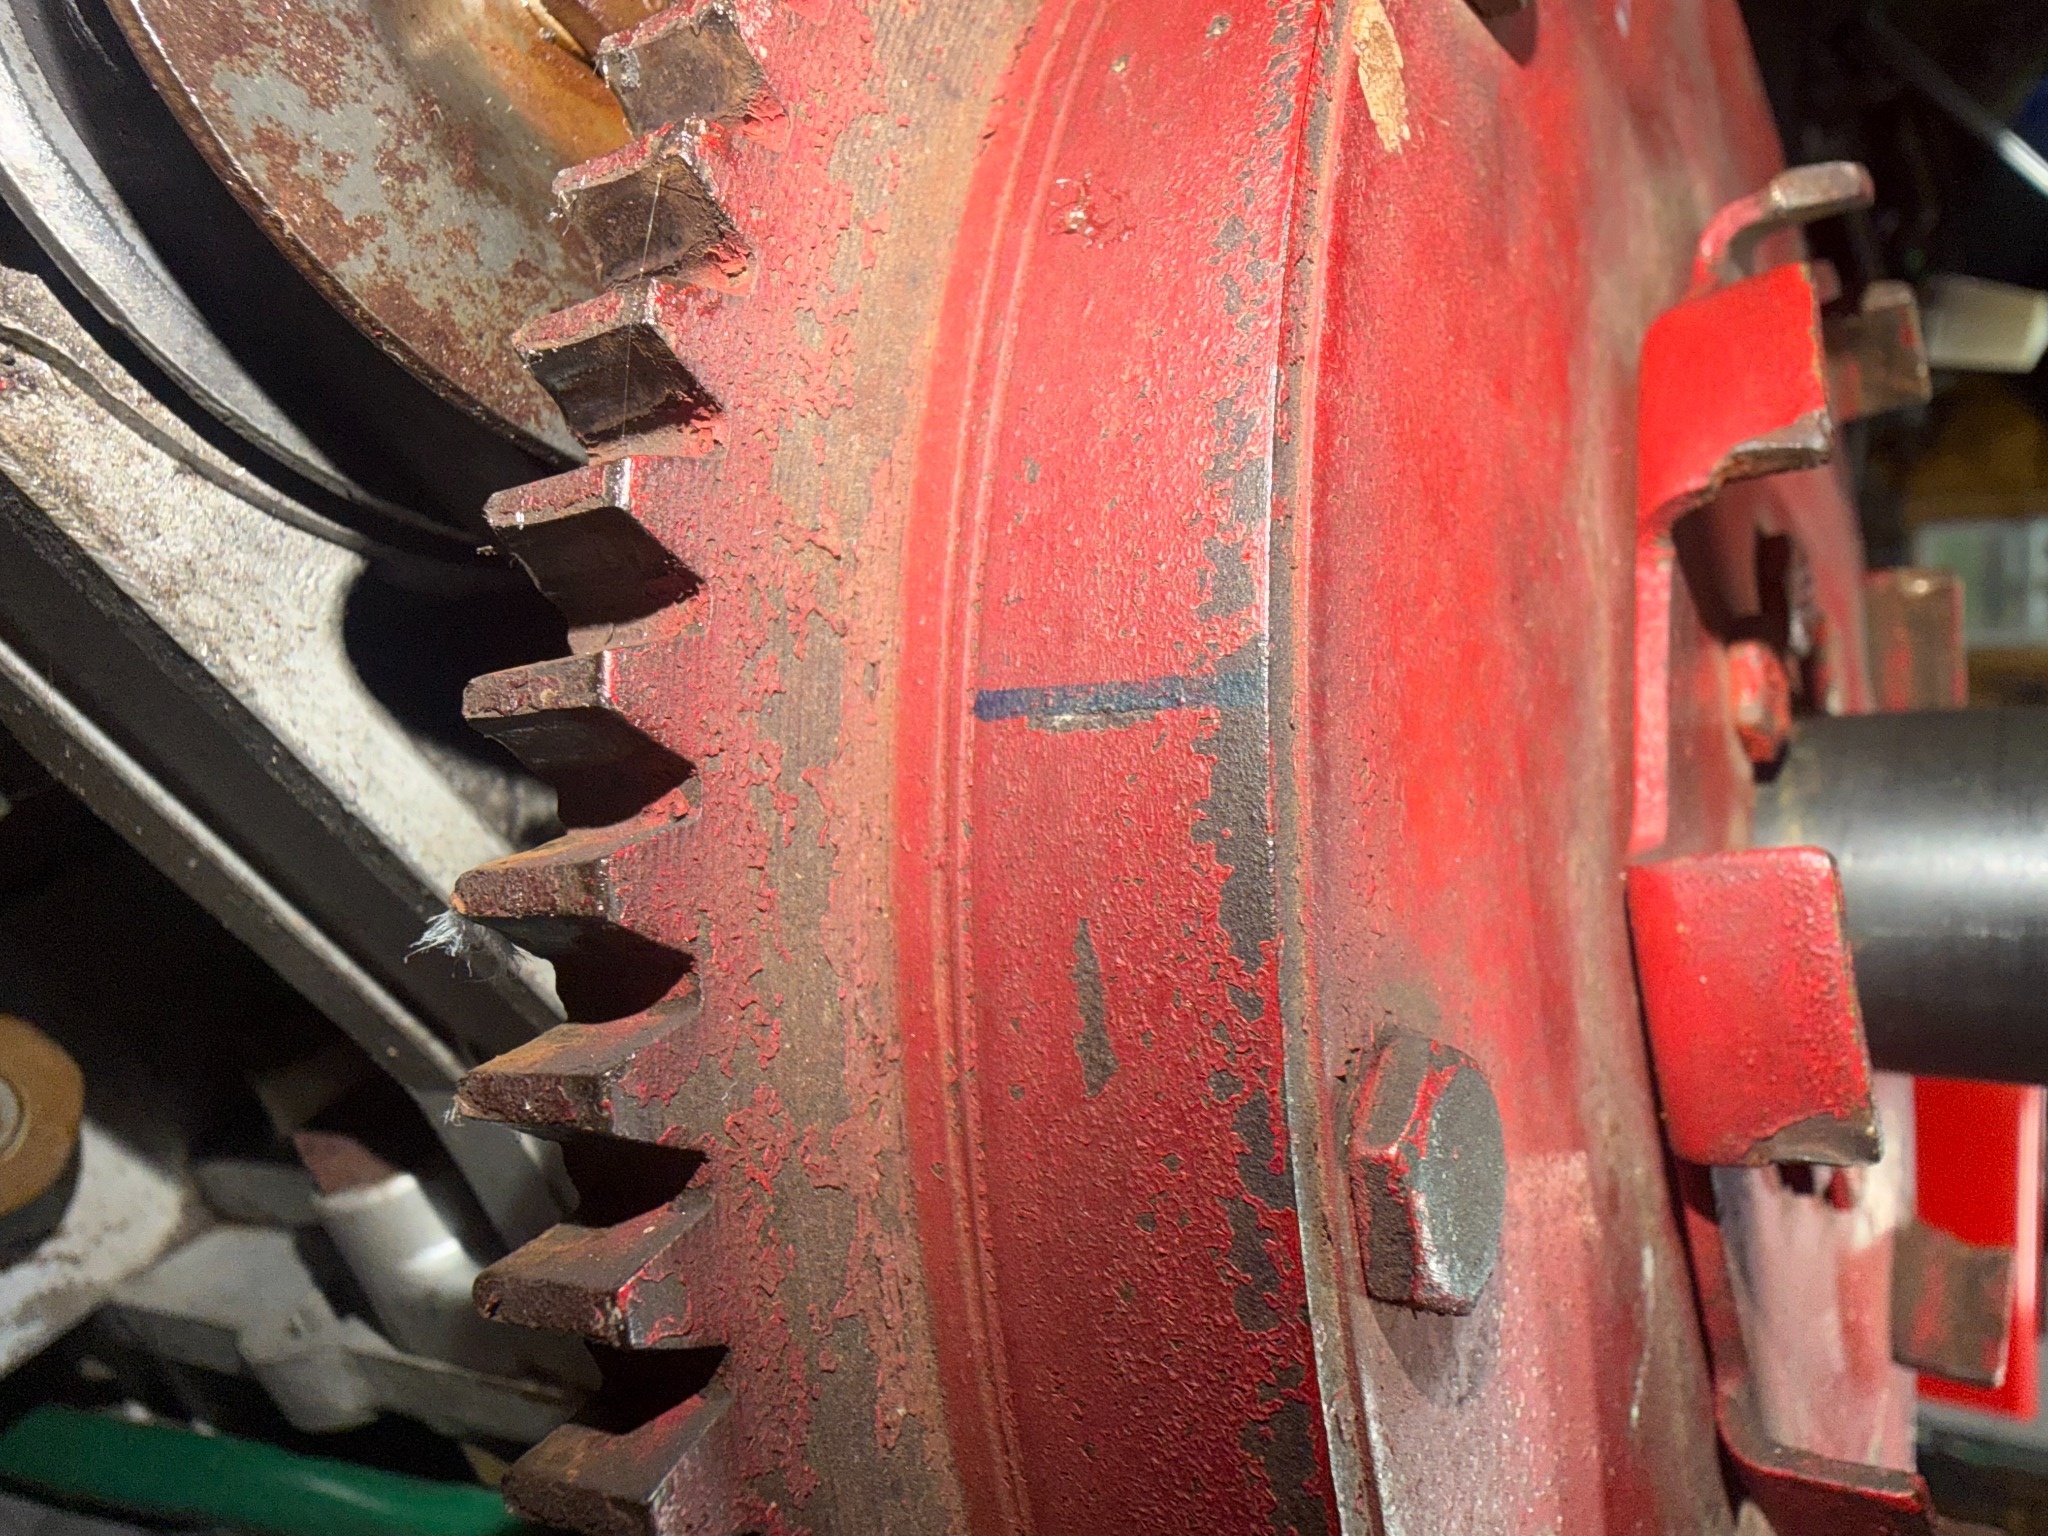
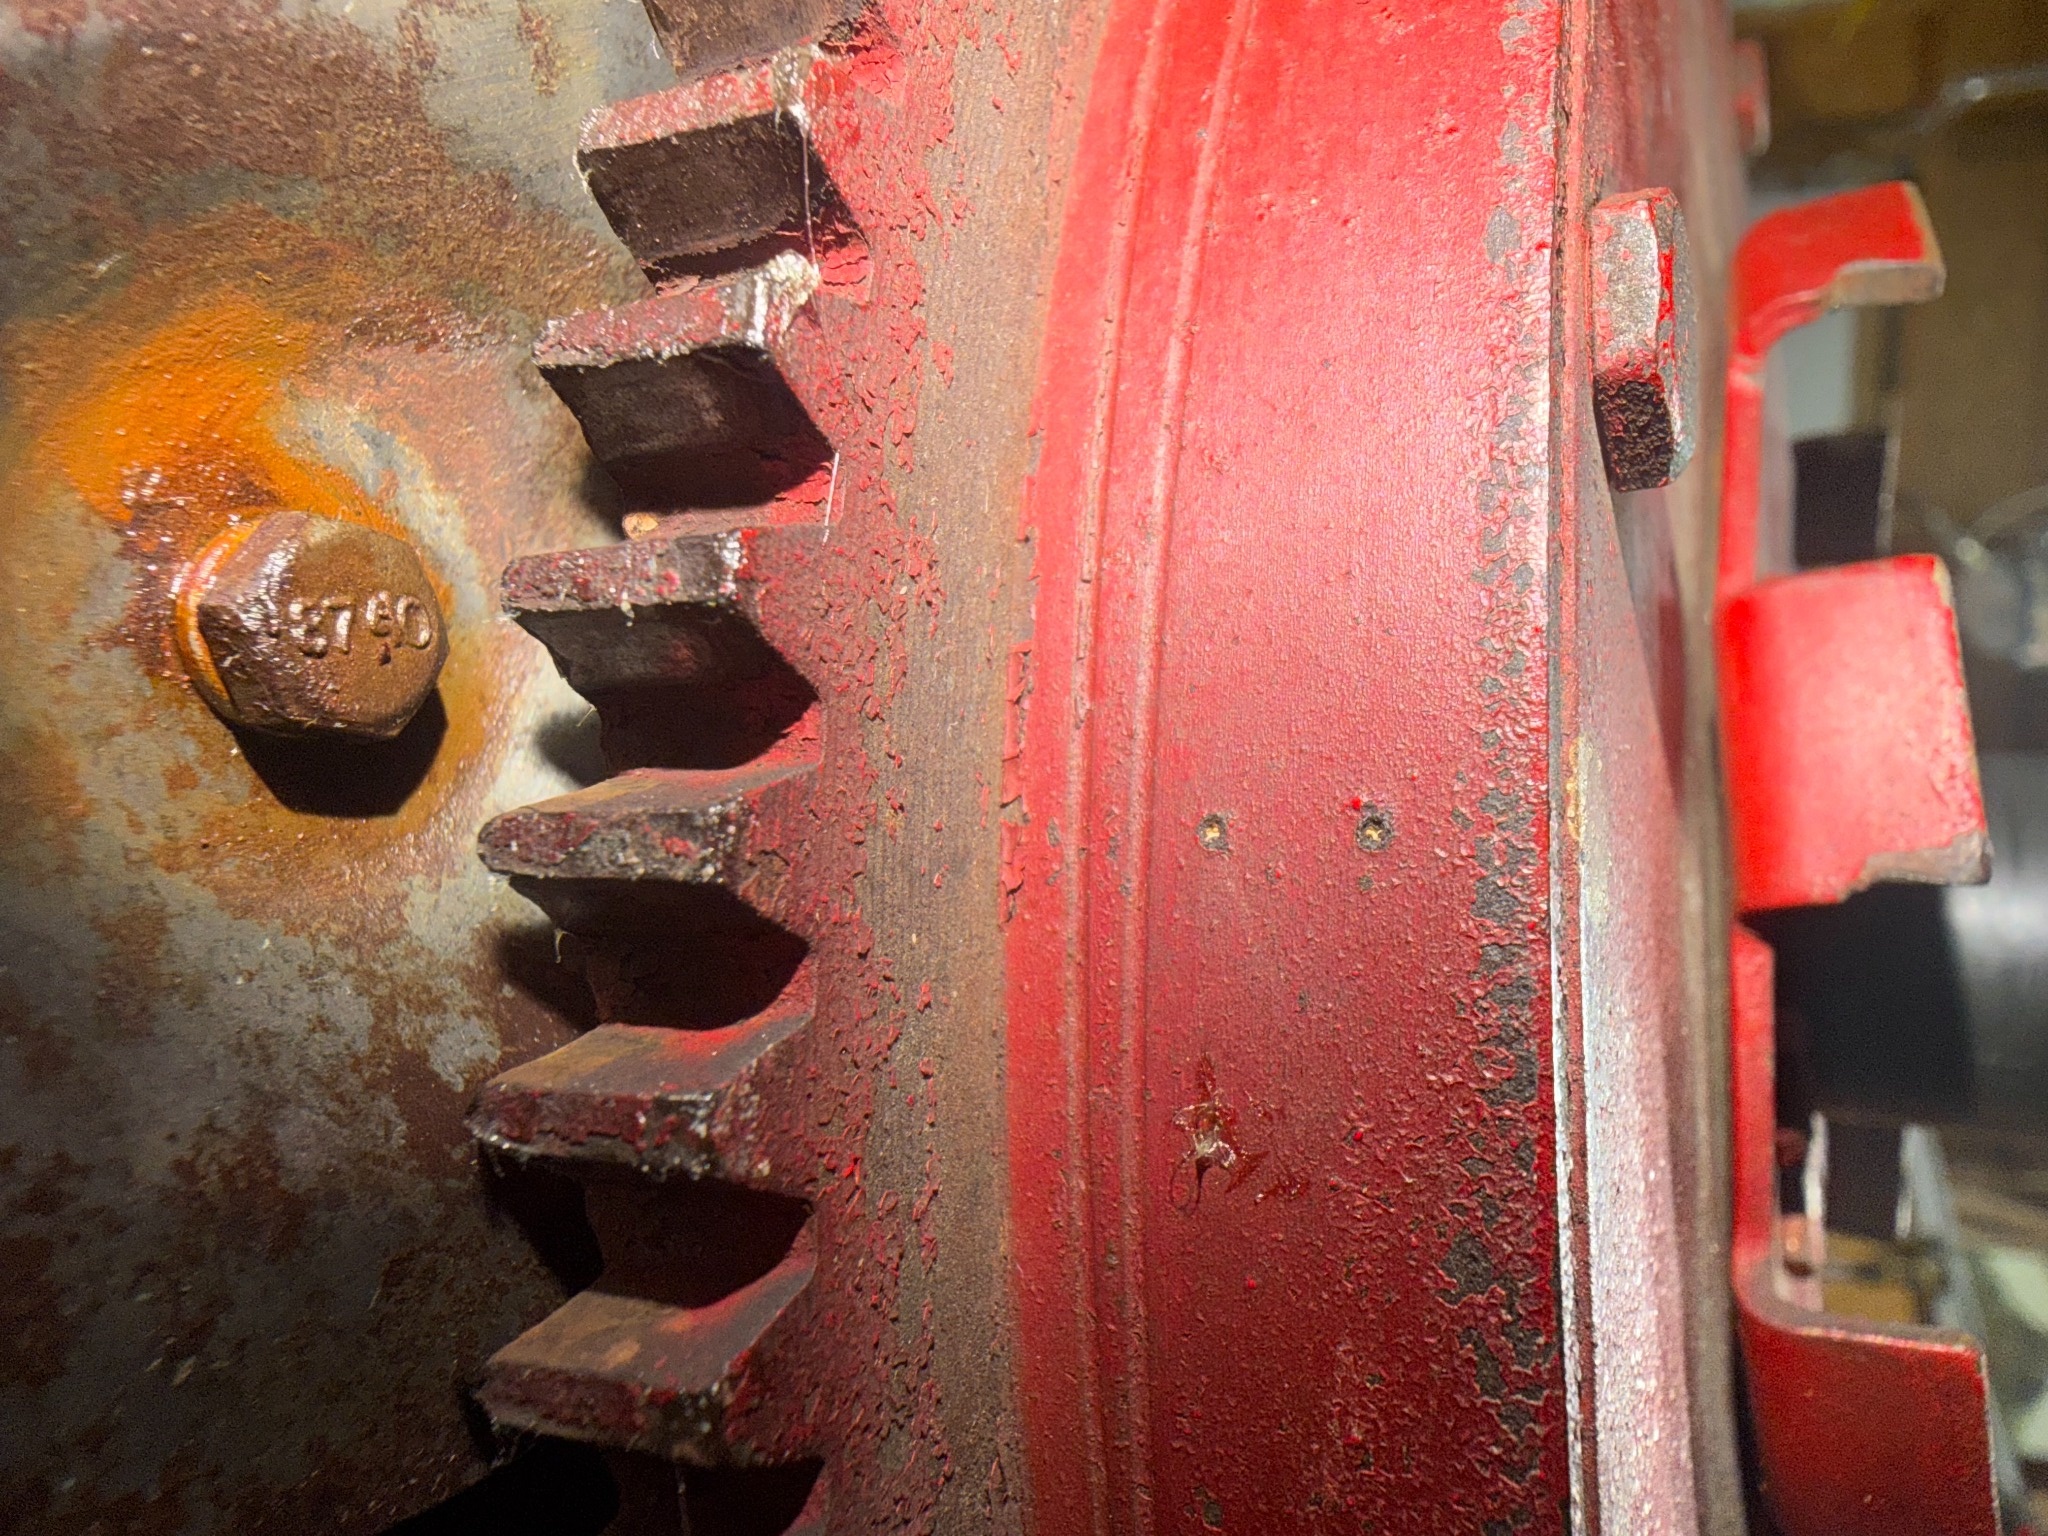
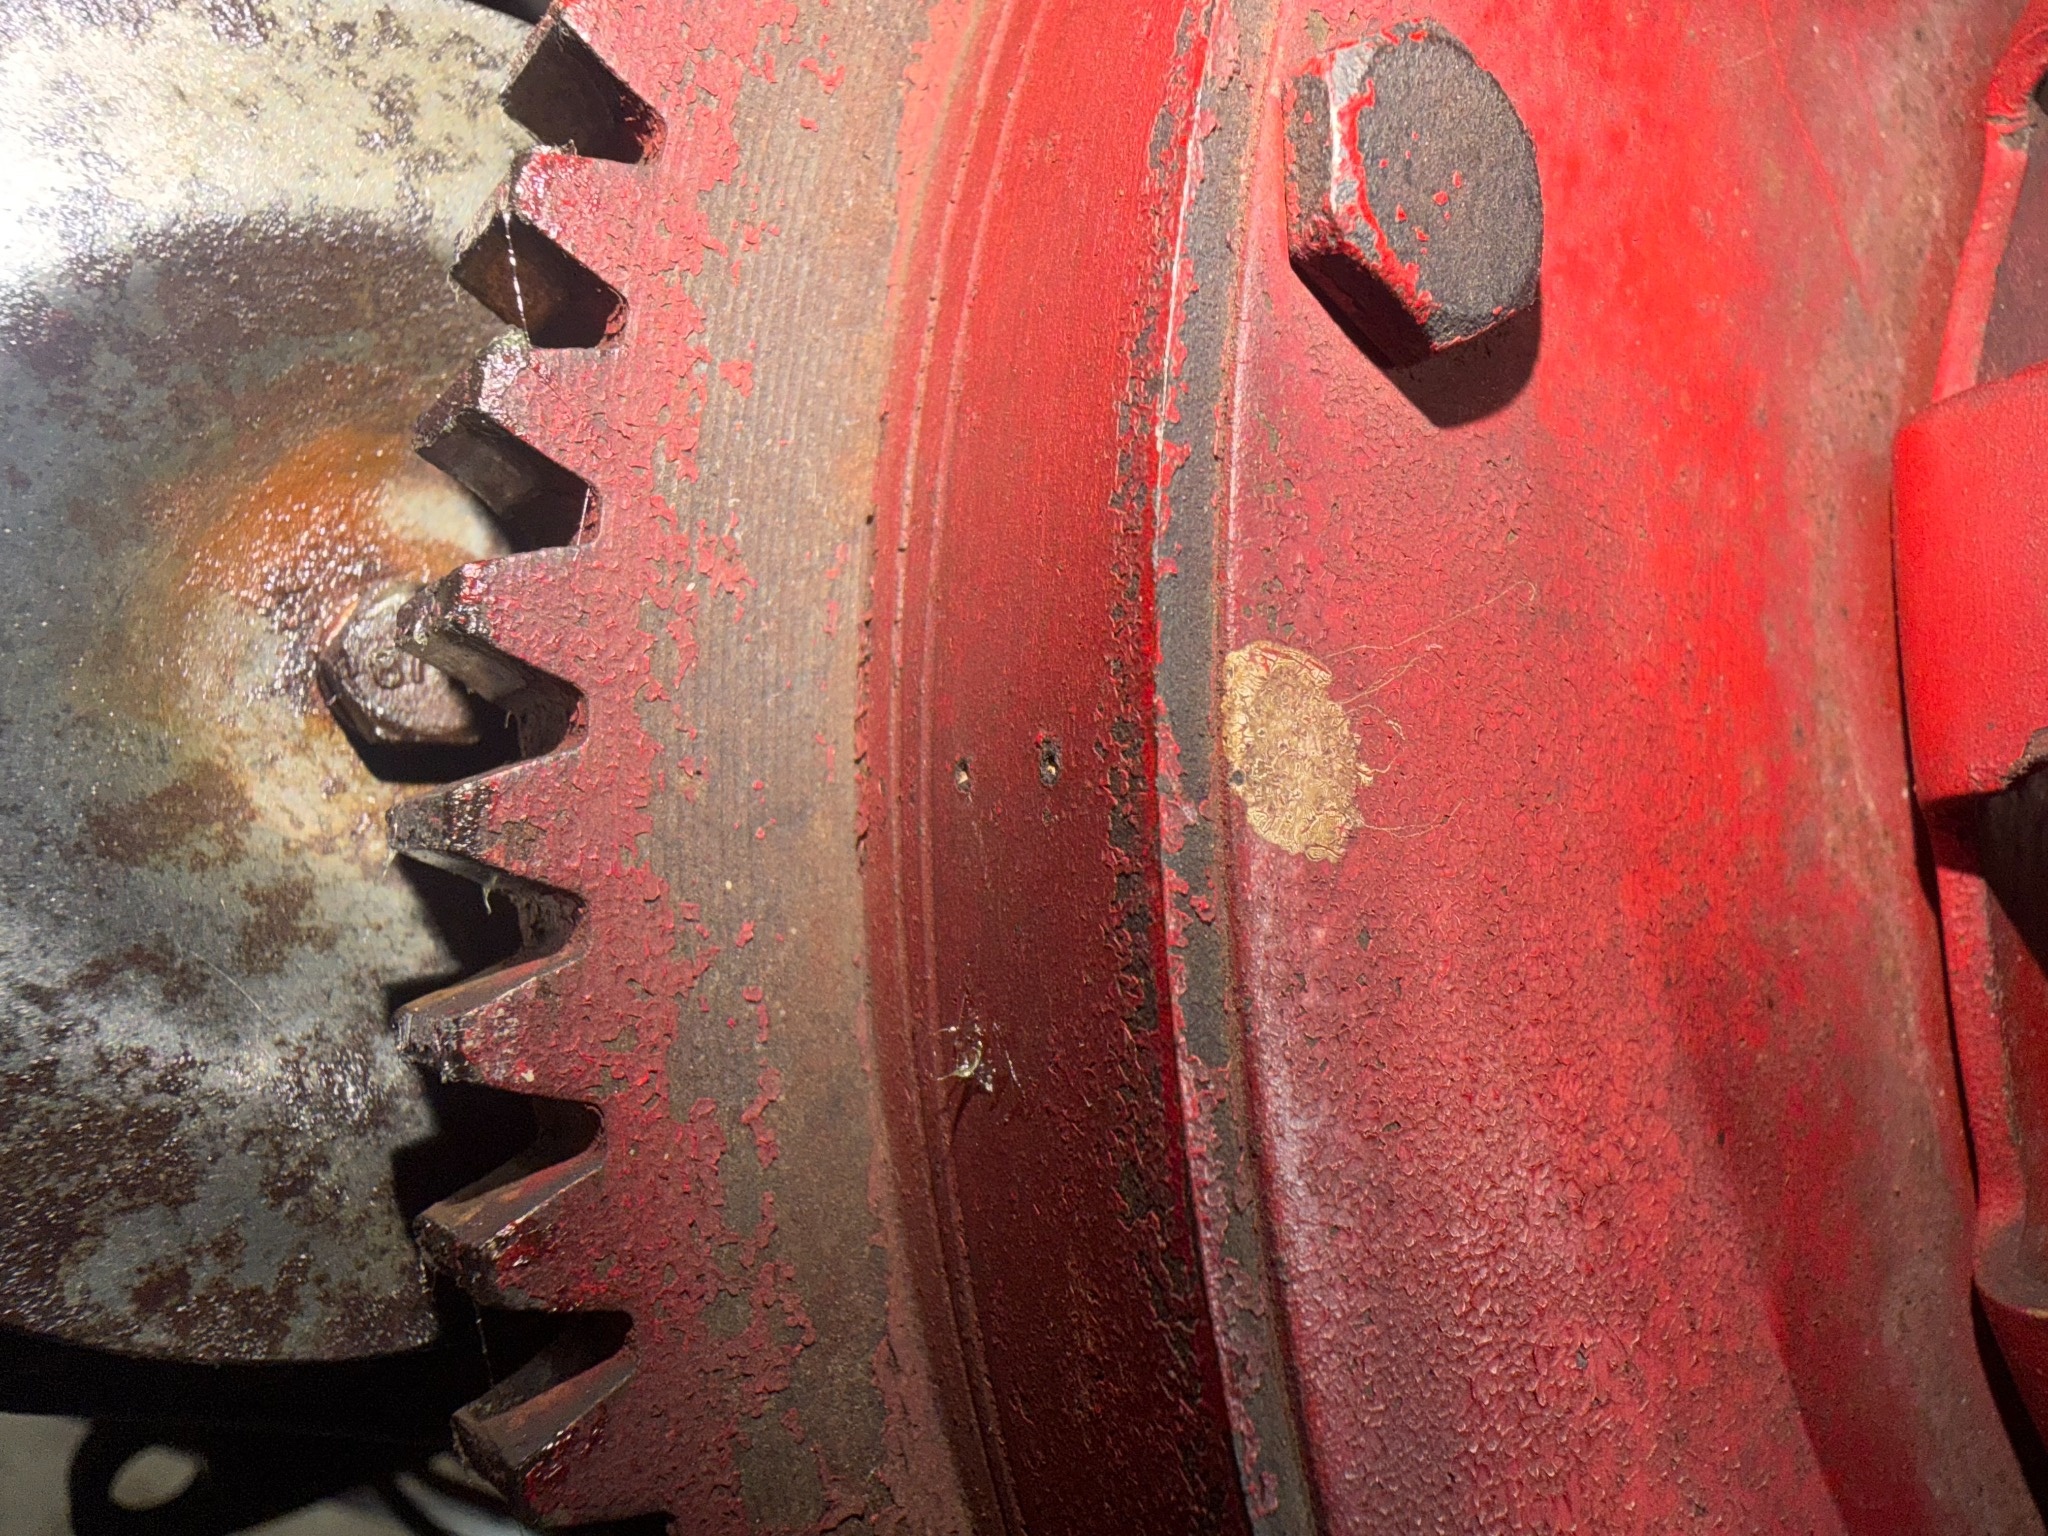
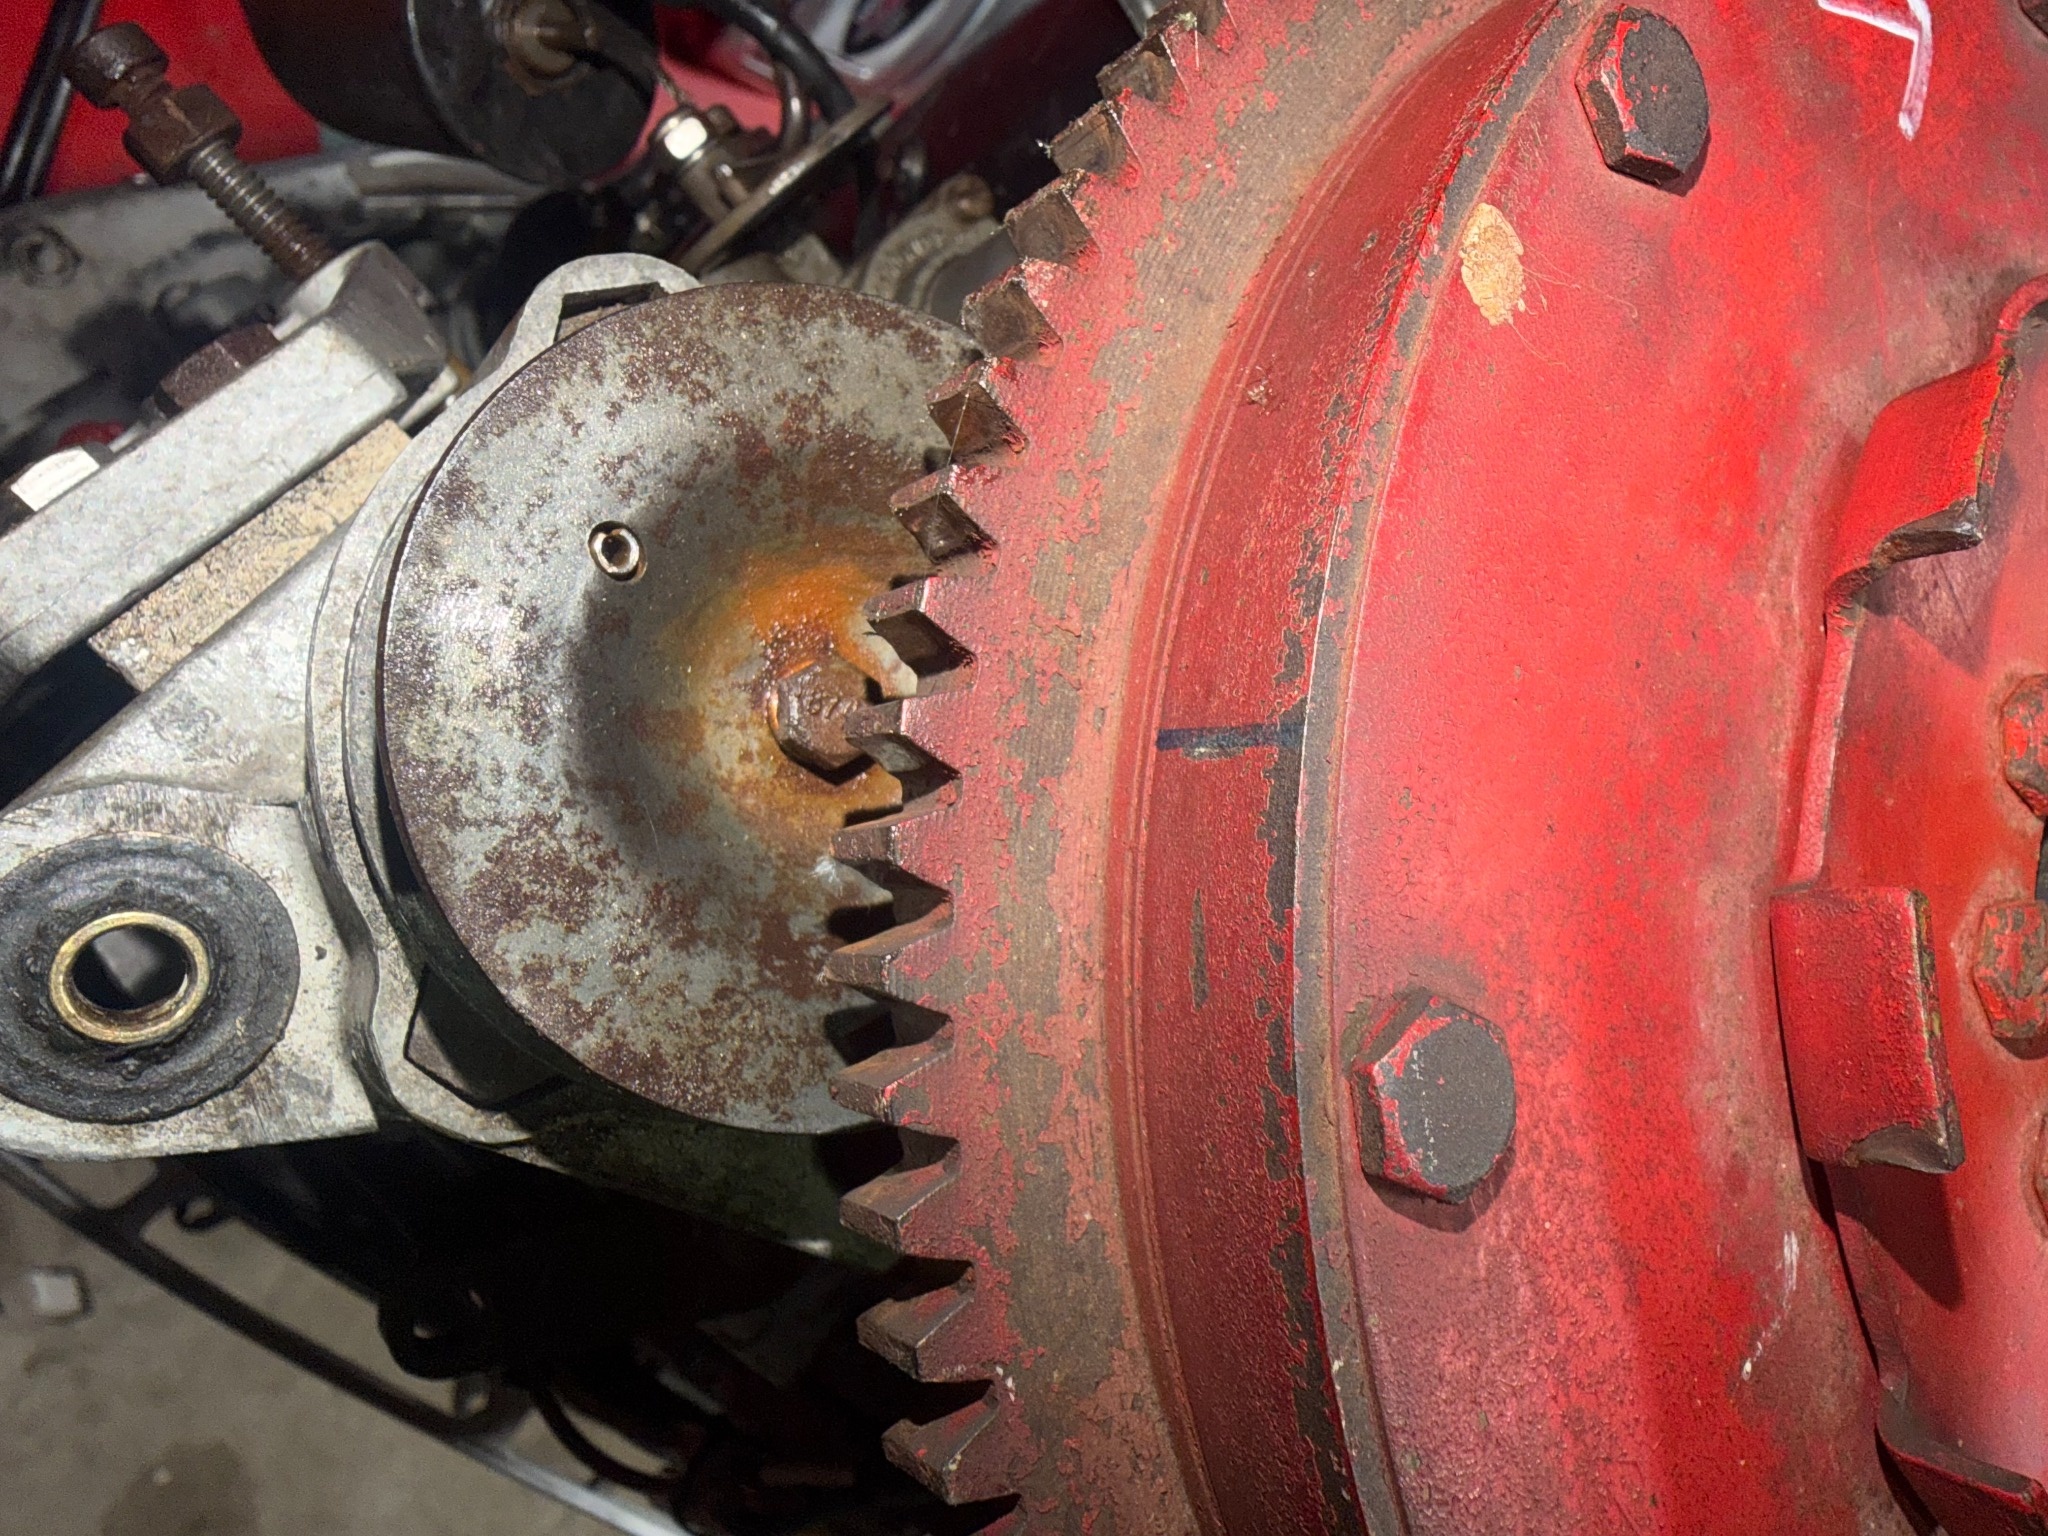
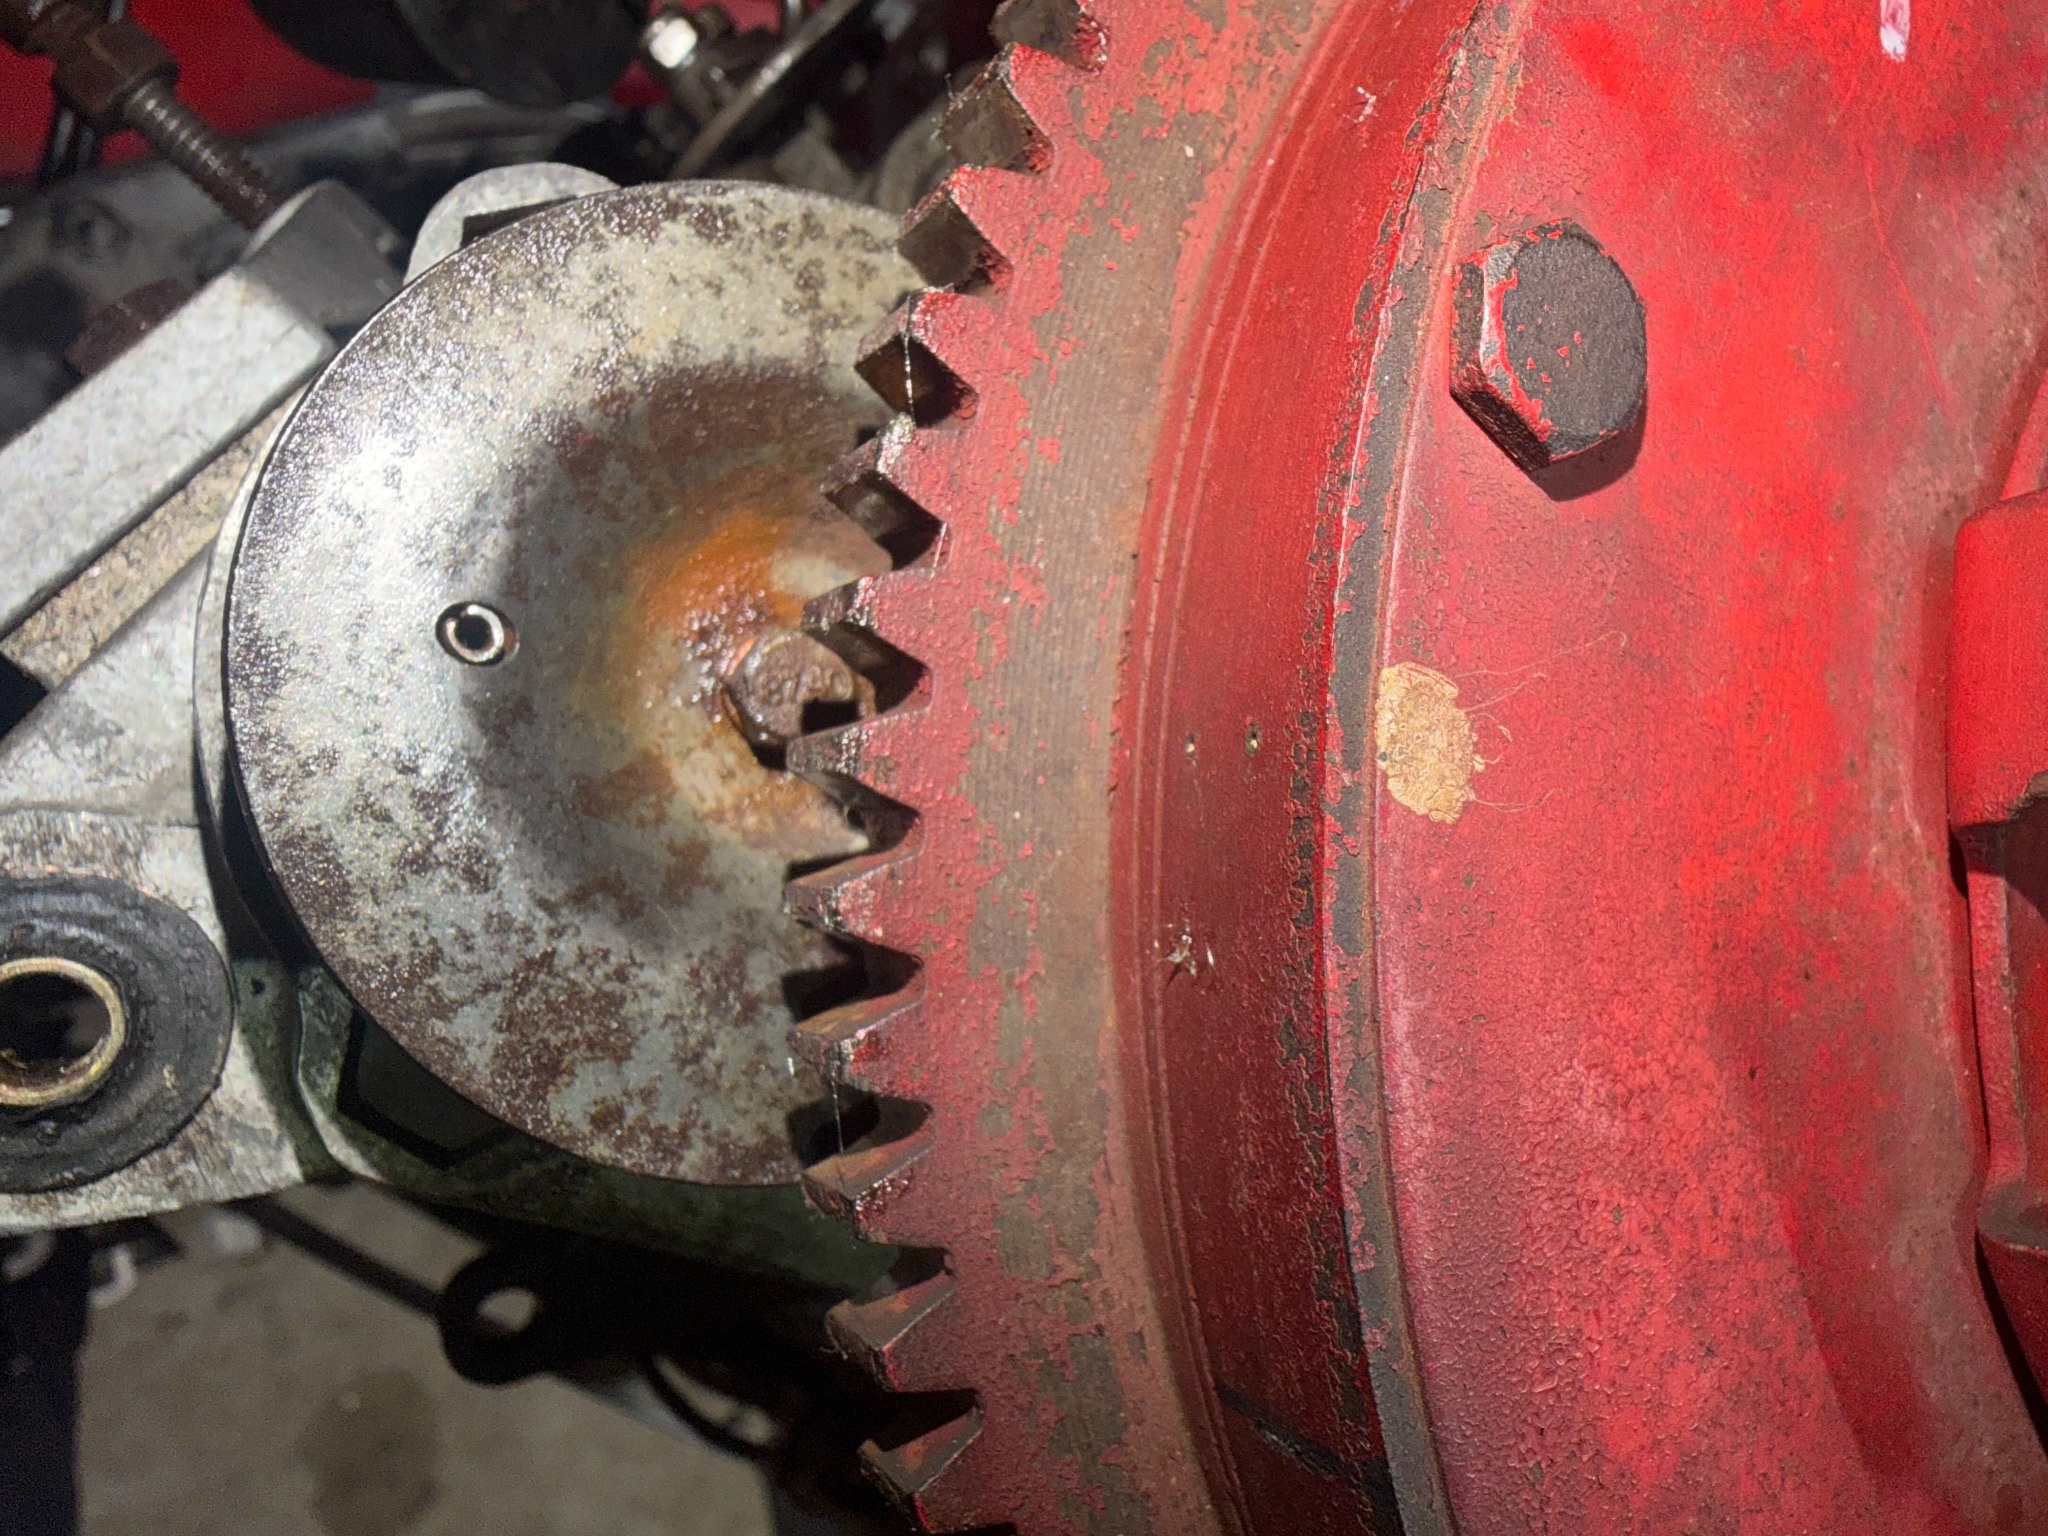
I have the manual for my 1963 Mercury 850 (85 HP), but I'm having trouble identifying the correct timing marks. The manual shows a line on the flywheel that should align with an arrow or pointer, but I also noticed another mark that looks like it could be the original factory timing mark. I've attached pictures showing both locations. Can anyone confirm which marks I'm supposed to use? Any help would be appreciated! I removed the cap and found the arrow. Also any help of setting the spark advance screw. I have it a .235 BTDC when turning the distributor CCW, and stop where the point breaks, I do not have enough screw and the distributor is barely advanced. Seems something is off. Any help would be appreciated.

Please Log in or Create an account to join the conversation.

1963 Mercury 850 – Distributor Rotor Movement 4 days 22 hours ago #149732

  • ed-mc
  • Offline
  • Platinum Boarder
  • Platinum Boarder
  • Posts: 1482
  • Karma: 235
  • Thank you received: 131
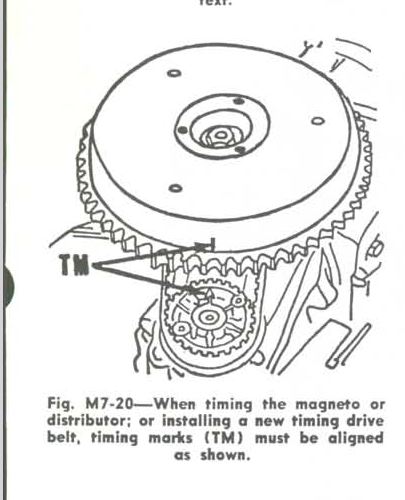
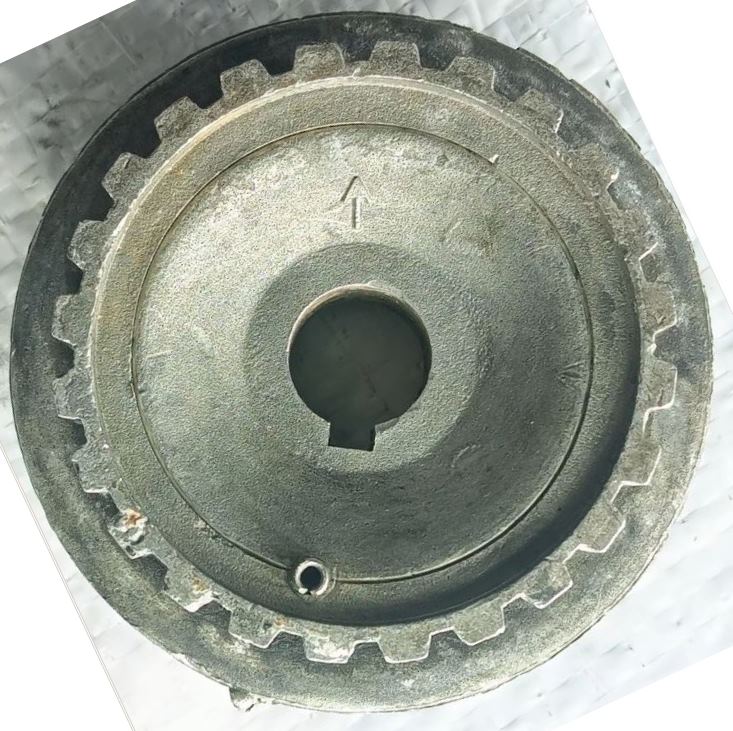
The long scribed mark on the flywheel is for the belt timing. You have to remove the top cover of the distributor drive pulley to reveal the arrow, which should point directly at the flywheel when the belt is properly aligned. See diagram below.

This is only for belt alignment and has nothing to do with the maximum spark advance adjustment. There are (3) screws on the front plate of the distributor; the outer-most screw is your idle speed adjust. You need to be adjusting this with the motor in the water, warmed up, and idling in forward gear. And this mixture adjustment needs to be done at the same time you're adjusting the idle mixture on all of the carbs.

What I'll do is get 'er nice and warmed up, let it idle in gear, then start at the top carb. Screw the idle mixture screw in slowly (CW), until the idle speed begins to falter. Then turn the screw CCW until idle smooths out. Turn the screw a bit more CCW (rich), until the engine starts to falter again. It should be "burbling" from being too rich. So, whatever that range of adjustment, from a bit too lean to a bit too rich, put the screw right in the middle of that range.

Repeat for the other 2 carbs. If idle speed is too fast or too slow at that point, then you'll need to loosen the lock nut on the Idle Stop. Don't move any of the other screws! Once you've adjusted speed, you may need to readjust the tension on the throttle cable. Quite easy to do, since it attaches from the outside. Just pull the cable off and turn the adjusting ferrule to increase or decrease slack. You want just a wee bit of tension pushing the distributor into the idle stop, when you're in Neutral and have the fast idle lever down.

After you're done with all the adjustments, do a test acceleration. If the engine tends to fall flat on its face when you accelerate, it’s a touch too lean. Turn each idle mixture screw 1/8 turn CCW and it should be just perfect.

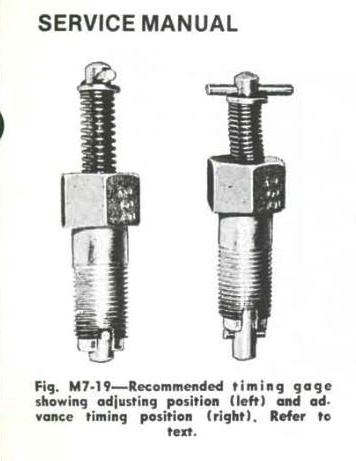
Getting back to timing adjustments, on this engine there is no marking on the flywheel, or a timing sticker. Mercury in their wisdom had a special timing gauge that screwed right into #1 spark plug hole. That gauge stopped the piston right where the points would open at full advance.

So pretty hard to simulate that. I suppose you could find TDC, then set up a dial indicator to measure the amount of piston travel, but I've never done that.
Another way might be to find TDC with a piston stop, then use a degree wheel to mark the flywheel at 32-1/2 deg BTDC. You'd also have to make yourself some sort of pointer (such as the later engines have), to be able to read TDC with a timing light, and also read the max advance mark with the light.

Note that the max spark advance for the 1963 850 FGS was 32-1/2 deg BTDC. Based on #1 (top) cylinder's points opening and firing the ign coil.

At any rate, if you haven't messed with the Timing Stop (the Lower, Inboard screw), I'd recommend leaving it alone. More important is getting the dwell properly set on the points.

If you have a real Mercury manual, it should take you thru the process of doing so. Also check old posts here in the Mercury section, 'cause I'm pretty sure we've been thru this many times.

The important thing is, the second set of points must open Exactly 90-degrees after the first set of points opens. If you had an electronic dwell meter you could probably work out a way to make that adjustment, too.

What I did was make a little cardboard box with a hole in it. Then set up the (detached from the distributor drive) distributor into the hole, so it would sit upright. I had an old rotor kicking around, so I screwed a pointer onto it. You can make a pointer that attaches to the top of the breaker shaft, easily enough.

Print out the Mercury Dwell and Synchronizing plate onto some card stock and make a hole in the center of that, so that it can be sandwiched between the dist. and the box.

You set your meter on Ohms and connect to the metal case of the dist, and other lead to the White wire coming out of the dist (IIRC). Line up the marks so those points open right on the mark on the plate. Note you’ll adjust the first set of points so it has the proper dwell (i.e. proper number of degrees between opening and closing).

After that, shift meter probe to the brown wire. Now, the points with the brown wire attached must open 90 deg after the 1st set of points. Doesn’t matter the precise time those points close, but they must fire the ign for their cylinders exactly 90 deg after the first set of points.
This is a dual-ignition setup, one set of points runs one coil and cylinders 1-3-5. The other set of points runs a separate coil and cylinders 2-4-6. And the rotor is split into 2 sections as well. If the 2 sets of points are not firing in synch with each other, it’ll create imbalances in the crankshaft which could cause poor idling and at worst, break the crankshaft!! So it is a very important setting.
BTW as I recall, an appropriate adjustment as a starting point for the points gap would be around .008”. These don’t have a wide (.020”) gap such as old magneto-powered Twins etc have.

If you get that dwell properly set between the points, and then get the idle mixture and speed set, she'll purr like a kitten.

The last screw on that front plate (Upper, Inwards) is the Throttle Stop. The distributor is supposed to stop at a certain point on WOT (Wide Open Throttle), so it doesn't force the throttle butterflies hard into the carburetor throats.

All you need is a bit of clearance (or "wiggle") on the top carb actuator, when the distributor is at WOT. This ensures you don't put too much pressure on the butterflies. If there isn't any clearance, screw the stop in to get that "wiggle". Be sure to tighten down the locknuts of any adjuster screw you move! There is a spec for that “wiggle” in the manual, BTW.

But again I wouldn't recommend moving the Spark Advance screw at all, unless you have a positive way of making the Max Spark Advance adjustment. Or maybe you’ll find one of the old Unobtainium, NLA timing stops!

I have the applicable pages out of the old Mercury Master Service Manual, that show exactly how to set up to do the timing adjustments. Send me a Private Message listing your email address, and I can forward some info to you.....ed
Attachments:

Please Log in or Create an account to join the conversation.

1963 Mercury 850 – Distributor Rotor Movement 4 days 21 hours ago #149733

  • ed-mc
  • Offline
  • Platinum Boarder
  • Platinum Boarder
  • Posts: 1482
  • Karma: 235
  • Thank you received: 131
I was checking over at John's Old Mercury Site (which is a Fount of Merc knowledge, BTW), a subscription site great for old Merc outboard Gearheads like myself (!), and came across a good post regarding timing adjustments.

Seems that John S. Mcintosh sells a bunch of old Merc-related items, including ignition tools. A neat site.

He has a dial indicator kit that's set up to do the timing measurement on these old dual-point distributor engines. Not cheep at $179 but what's your engine worth to you!!

johnsoldmercurysite.com/phpBB3/viewtopic.php?p=145284&hilit=timing+tool#p145284

He also has available for $65 a sync/dwell plate kit that comes complete with plate, very nice pointer, hold-down screws, and instructions:

johnsmcintoshvintagemercuryoutboard.com/6CylDegreePlate.html

If you really really want to learn how to do this stuff, well there are the tools that will let you do so!

BTW that subscription to John's Old Mercury Site is only $15/year. The depth and breadth of info available there is unreal and it's probably the best source for lovers of old Mercury/Kiekhaefer outboards. Merc engineers, and those who worked with or knew the engineers in the 50's, and/or actually knew Karl Kiekhaefer, have posted there in the past. Mercury Royalty!

Just as an aside, back in the Day these engines were running on really good gas. They don't like ethanol. If you can get non-alcohol fuel in your area, I'd strongly advise you to run that thru your 850 and nothing else. Alcohol-laden fuel will eat up the old fuel lines, ruin fuel pumps and corrode carburetors. Not to mention making the engine run leaner and hotter than it should.

If you have no non-alcohol fuel available, at minimum run some sort of quality fuel treatment + stabilizer in all of your gas. Use a Mercury Premium outboard oil, mixed somewhere between 40:1 to 50:1.

The oils I was running back in the 80's wasn't nearly as good as what we have nowadays. And we ran the living tar out of all of our old outboards on 50:1, water skiing, tubing, racing around the lake. They held up pretty well. Of course, at the time they were only 20 or so years old. Now they're what, 60+ years old!!! Gotta treat 'em nice, eh!!

www.johnsoldmercurysite.com/phpBB3/index.php

Please Log in or Create an account to join the conversation.

1963 Mercury 850 – Distributor Rotor Movement 4 days 10 hours ago #149734

By chance did you happen to see on the photos the two areas that I am looking at? Currently the arrow points at the two spots on flywheel, where I did have it "running" Trying to figure out if that other straight line is the original or not. This motor has been touch by many people, who knows who has touched what. I got the impression no one got it running good and sold it. Its attached to a 1963 16' StarCraft Catalina. Its had several owners per the history on the titles. So it has become a personal challenge to get it running. I got the .235 from the manual and using a dial indicator for motors. It shows the tool you mentioned as well. I attached the manual page I am using. I will also check out different chats on timing, Thanks!
Attachments:

Please Log in or Create an account to join the conversation.

1963 Mercury 850 – Distributor Rotor Movement 3 days 19 hours ago #149735

  • ed-mc
  • Offline
  • Platinum Boarder
  • Platinum Boarder
  • Posts: 1482
  • Karma: 235
  • Thank you received: 131
Now the site is cancelling out my posts. I guess they don't want me posting here anymore, they think I'm a Hacker!! Will see if this goes thru. I've responded to your last post TWICE and it keeps blanking me out.

Please Log in or Create an account to join the conversation.

1963 Mercury 850 – Distributor Rotor Movement 3 days 19 hours ago #149736

  • ed-mc
  • Offline
  • Platinum Boarder
  • Platinum Boarder
  • Posts: 1482
  • Karma: 235
  • Thank you received: 131
OK, that post worked. MODS, Why are you censoring my posts and accusing me of being a HACKER? Can't I post a link to Amazon, is that the problem and WHY??

Please Log in or Create an account to join the conversation.

1963 Mercury 850 – Distributor Rotor Movement 3 days 19 hours ago #149737

  • ed-mc
  • Offline
  • Platinum Boarder
  • Platinum Boarder
  • Posts: 1482
  • Karma: 235
  • Thank you received: 131
Back to doing something!! Here's a good pic of the distributor pulley that clearly shows the arrow cast into one of the ribs. And I'll paste in what I wrote last time, without any A m a z o n links and see if that works.

Bring #1 piston to Top Dead Center (TDC). Whatever mark lines up with the arrow on the distributor (which should be pointing to the center of the crankshaft), is your timing mark. If there is no mark that lines up, make one with a Sharpie.

If you want to determine TDC Dead Nuts On, use a timing stop or other tool. Lots of different ones available at Amazon, including a tool that whistles as the piston is coming up, and stops right when the piston hits TDC and no more air is flowing out the cylinder. Pretty neat, eh!!

I'll leave you to search A M A Z O N for "top dead center tool" since I don't want to be accused of being a hacker again.

Just trying to help!
Attachments:

Please Log in or Create an account to join the conversation.

1963 Mercury 850 – Distributor Rotor Movement 3 days 19 hours ago #149738

  • ed-mc
  • Offline
  • Platinum Boarder
  • Platinum Boarder
  • Posts: 1482
  • Karma: 235
  • Thank you received: 131
"Error A sequence has been discovered that could indicate a hacker attack. Your request can not be processed."

MODS: WHY AM I GETTING THIS WHEN I POST? I AM NOT A HACKER!!! FIX THIS.

Please Log in or Create an account to join the conversation.

1963 Mercury 850 – Distributor Rotor Movement 3 days 8 hours ago #149740

Again, your information has been invaluable! I've learned more in the last 24 hours than I have from reading the manual over and over. I'll keep trying to figure things out on my own without pestering you too much, but I still have about a thousand questions! LOL

Please Log in or Create an account to join the conversation.

1963 Mercury 850 – Distributor Rotor Movement 2 days 21 hours ago #149742

  • ed-mc
  • Offline
  • Platinum Boarder
  • Platinum Boarder
  • Posts: 1482
  • Karma: 235
  • Thank you received: 131
Keep plugging away! That's how I learned, by doing! And reading the manuals!

I'll try to help if this clunky old forum allows!!

Note they aren't having these problems over at John's Old Merc Site.

IMHO the $15/yr is worth it, for the less-aggravation alone, not to mention the extensive Merc content and expertise there.

Please Log in or Create an account to join the conversation.

  • Page:
  • 1
Time to create page: 0.093 seconds

Donate

Please consider supporting our efforts.

Glassified Ads

1960s fleetform 18 ft catamaran
( / Boats)

noimage
11-07-2026

1959 Crosby Sweptfin
( / Boats)

noimage
11-07-2026

1969 Searay 17 Foot
( / Boats)

1969 Searay 17 Foot
10-14-2026

FG Login

FiberGoogle

Who's Online

We have 14579 guests and no members online