Welcome, Guest
Username: Password: Remember me
  • Page:
  • 1

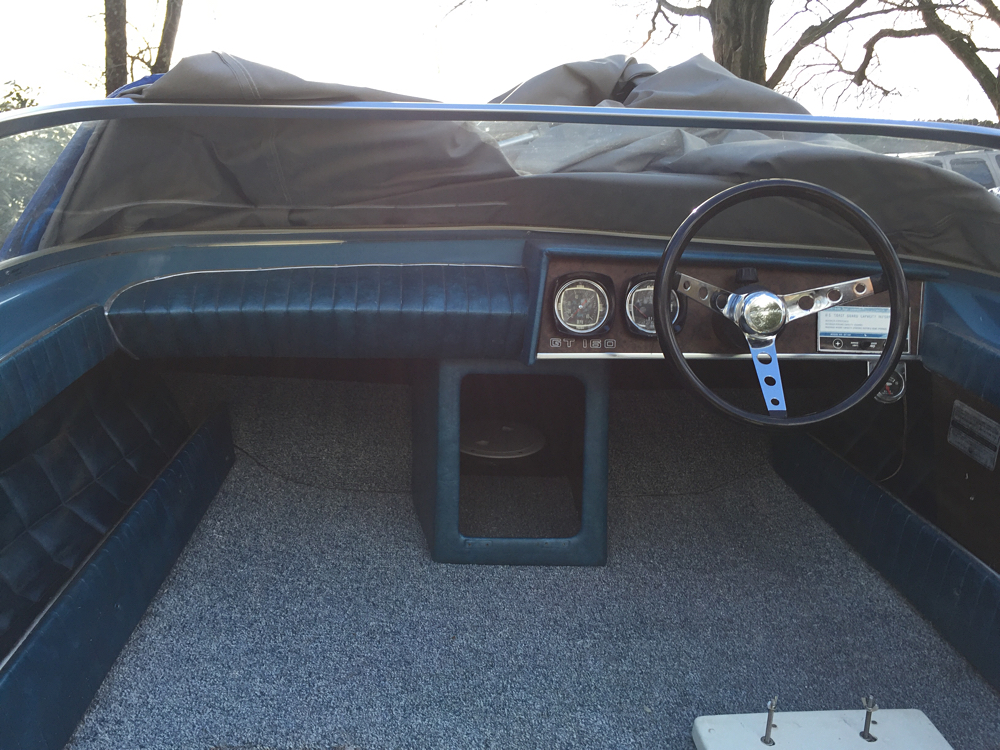
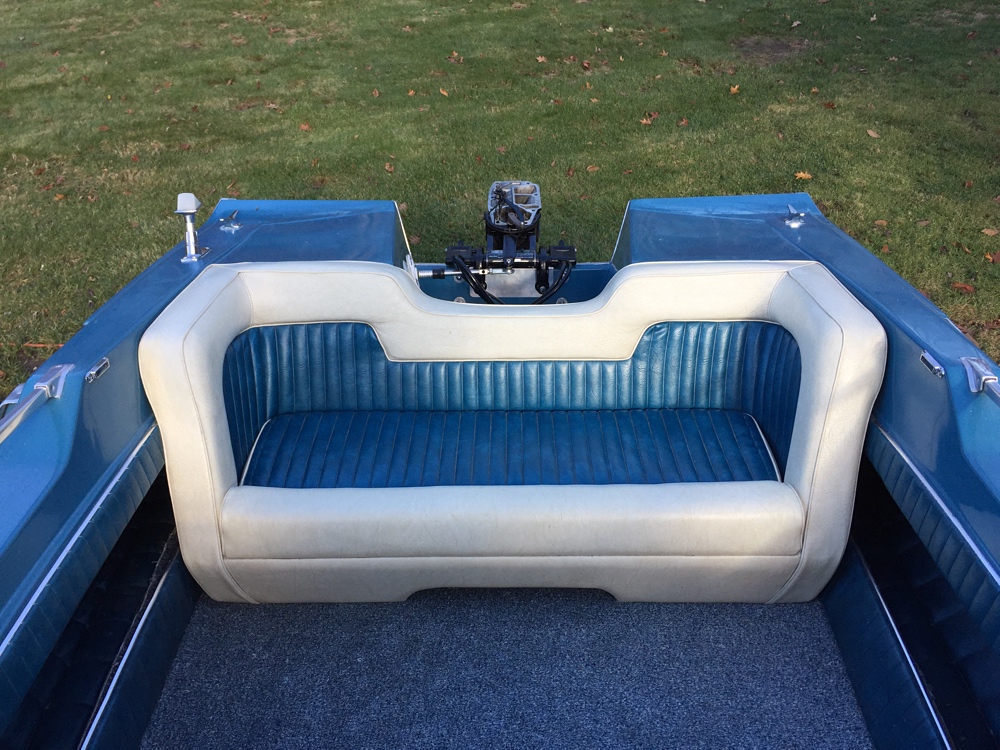
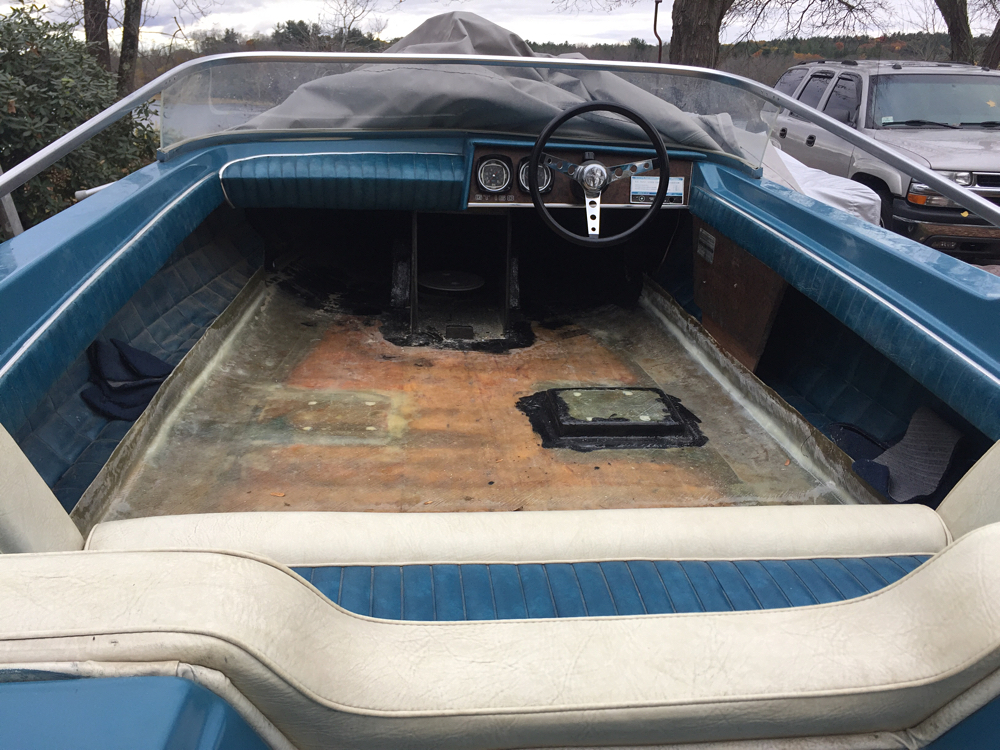
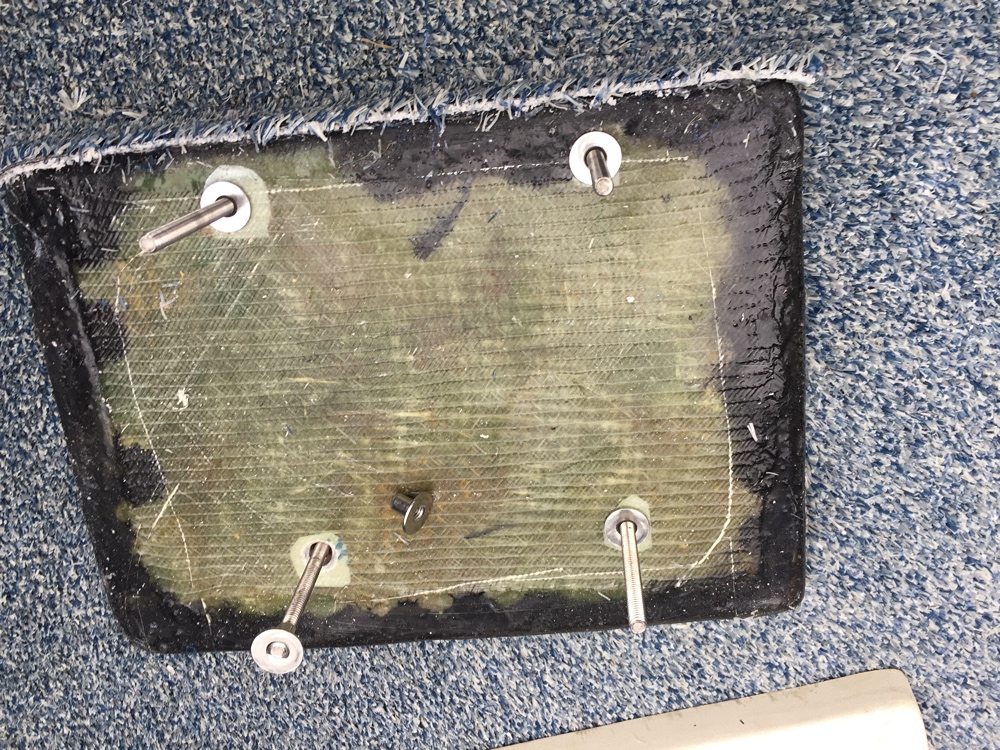
TOPIC: GT160 resto or What you do on a minty barn find

GT160 resto or What you do on a minty barn find 7 years 4 months ago #128624

  • 63g3
  • Offline
  • Contributing Member
  • Contributing Member
  • Posts: 464
  • Karma: 62
  • Thank you received: 2
Hi all,
Well another project has put my grinder to work. I need another boat like Warren Buffet needs more money but, when you see something good and you've been "casually looking" I guess your bad habit takes control. That said, proudly I can say I sold one to get one so fleet size remains the same.
What really happens is you fire sale what you have to over pay for what you want. Ha ha.
I picked this Glastron up in late August, from Canada, picture is at boarder crossing, incredible condition all around. The only "flaw" was it did not have an inline 6 and the original Glastron steering wheel was replaced with a three spoke aftermarket, still had original teleflex in it though. (This came with a near new 850....anyone need one? This motor is amazing and I've seen a lot of older Mercs.
So a few things really got me going on this before taking the purchasing plunge which I took as a "message from above" i.e. weak justification:
One was I found a near new, essentially unused correct year in line 6 1150 within easy driving distance.
Two was there was a correct Glastron wheel listed on eBay
Three Angola canvas in Ohio (I'm in Massachusetts) had the original patterns for a full mooring cover so I could get one without supplying the boat....and at a reasonable cost.
This would all make a heck of a package when combined.
So now I collected about the best as it gets vintage boat and motor....now the work starts...... as there is no such thing as a water ready untouched original. Despite the fact these are relatively unused examples there are multiple issues needing correcting either due to poor workmanship and aging on the boat and simple old age on the motor. There seems to be many well cared for original vintage boat motor combos out there that have been in garages etc. for many years...sadly that generation is passing away......so I thought it might be helpful to share some things to consider doing on what on the surface looks to be ready to go.
More to follow but I gotta stop typing right now....gotta get to the office!
Randy
Attachments:

Please Log in or Create an account to join the conversation.

Re:GT160 resto or What you do on a minty barn find 7 years 4 months ago #128648

Excellent find Randy, Congrats.

Bob

Please Log in or Create an account to join the conversation.

Re:GT160 resto or What you do on a minty barn find 7 years 4 months ago #128688

  • 63g3
  • Offline
  • Contributing Member
  • Contributing Member
  • Posts: 464
  • Karma: 62
  • Thank you received: 2
We all know the wood in the transom, floor, stringers etc. are the bugaboos on the older glass boats, so I did some investigation at time of purchase but it's difficult at best when you can't really dive in. Anyways, the tell tales all looked good but still lots of anxiety, as the idea was a simpler less involved resto and purchase price reflected that.
Once home I resisted putting it in the water, the boat had been dry for decades and did not want to start water wicking in anywhere through crumbly or inadequate sealers at any underwater locations so...
I pulled off the motor, removed interior and carpet and removed all the transom hardware and tapped out the drain tubes in the transom and motor well.
This would allow better assessment if there was any lurking rot and future vulnerabilities.

So all looked good picking at all the now exposed transom ply through the holes...whew! I will commend Glastrons transom top workmanship as it was done pretty darn well compared to a lot of bare wood under metal trim I've seen on other makes. It looks like they install resined up glass over the top before installing the deck which caps the transom top from water, not perfectly done room for improvement but decent. All the transom edge trim is not sealed in anyway so lots of pathways for water to trickle in undeneath, unnoticed.
Bolt locations are obvious entry points for water but, the drain tubes coming out are important as water will wick between the brass tube O.D. and the Hole, these are generally pushed in so basically any sealer gets squeegeed off right at install and it's only the small flared flange that provides the sealant a place to do it's job. Obviously the hull tube is critical but, so is the motorwell as a small amount water almost always is sitting right at the tube height so it is contacting water 24/7.
Next will be looking at stringers and floor.
Attachments:

Please Log in or Create an account to join the conversation.

Re:GT160 resto or What you do on a minty barn find 7 years 4 months ago #128724

  • 63g3
  • Offline
  • Contributing Member
  • Contributing Member
  • Posts: 464
  • Karma: 62
  • Thank you received: 2
Next up was to look below the floor, lots of wood under there to worry about.
I took a 2 and 1/4 inch hole saw and pumped sight holes to probe and poke through. Some near stringers,
between stringers around the seat bases and in the transom area near drain well and up under the bow.. I kept all the plugs to use when closing up the holes if all looked OK.
Like all the boats I've ripped apart for resto, the Glastron did not seal the underside of the plywood floor and for that matter a not so very good glass job was done on the topside, which then gets covered in carpet...think sponge....so it's particularly vulnerable to rotting. For floatation, they used glued in foam blocks which also are susceptible to water logging. The holes will allow a good assessment with a minimum of disruption to repair.

All the under floor foam, stringers and the plywood looked as dry and healthy as the day it was installed so another big sigh of relief!!!!
Attachments:

Please Log in or Create an account to join the conversation.

Re:GT160 resto or What you do on a minty barn find 7 years 4 months ago #128726

  • 63g3
  • Offline
  • Contributing Member
  • Contributing Member
  • Posts: 464
  • Karma: 62
  • Thank you received: 2
So, it's a good dry boat, now it's time to fix all the problems that would eventually lead to water related damage.
I'm sure you, as I, shake my head when you see the very simple flaws that allow water to get in and water log the wood and foam components. But alas these were never intended to last decades,so to some degree I understand a job deemed as good enough would not last much beyond 10 years of normal use and minimal care. Most water issues are silently degrading the boat un noticed. This all accelerates with age and as subsequent less interested owners come into play.
As far as build flaws there were many. The main area of concern is the area between the floor and the hull.
Very typical construction of stringer/ plywood floor. There were multiple places for water to seep or directly drain to this area with limited and inadequate provision for it to drain out and ventilate.
The stern area is the "low point" when boat is floating so water would naturally run to the back so obviously this area must be looked at closely. Although the bow area would seem less vulnerable it always confounds me how many people have the boat parked bow down which water both above and below the floor would never drain, so this area needs equal scrutiny.
Places for water to intrude was as follows:
On the transom in addition to the through holes and unsealed trim as detailed in the earlier post it also had poor glass workmanship in the area of the drain well, any water collecting in the well, highly likely where it is low point would wick into the wood core.
The floor had poorly glassed corners in the tank area which being to the rear and being lower than the floor meant water could easily collect and dribble down into the area below the floor to collect and also wick into the plywood edges. I also found a saw cut in the plywood floor right where rear seat passenger feet would rest so another spot for water to dribble and soak into the plywood edges.
Moving further forward, multiple 3/4 inch holes where discovered in the floor to drain the under deck ski locker area 4 in total.
So lots of places for water to get in below decks and wick into the foam stringers and bare plywood floor underside.
Most disturbing of all was the drain well itself. I mentioned the poor transom glass but I also discovered two 3/4 inch holes drilled in an attempt to allow the water below the floor to drain......good idea but, incredibly poor excecution. Both holes were drilled about 1 1/2 inches above the bottom so at best there would be incomplete draining below the floor and at worst, perfectly located holes in the drain well to allow water entry under the floor, one of them was drilled into the center stringer, creating more exposed wood edge. The factory installed loose fitting, push in, tapered rubber stoppers which did not really seal the holes. Sitting water has 24/7 to run in and in the event a savvy owner tipped the boat way bow high to get all water to run back, they better know to pull those stoppers out, inhibiting drainage, these are not easily seen or reached. I'm gonna say most owners would not have a clue about this. Even if they did the high hole location under floor still would not drain completely.
So water collecting from above had nice holes both front AND rear to drain below the floor...disaster.
It was interesting to see Glastron provided a small rubber breather tube so the air pressure would normalize the area "closed off " (ha ha ha) under the floor....with all these drilled holes one would think the tube is a needless provision.
I did not get any good pics of the holes as I could not get camera positioned to get meaningful pictures.

Please Log in or Create an account to join the conversation.

Re:GT160 resto or What you do on a minty barn find 7 years 4 months ago #128729

Great write-up Randy!
Lots of important insight indeed!
doc F

Please Log in or Create an account to join the conversation.

Re:GT160 resto or What you do on a minty barn find 7 years 4 months ago #128824

  • 63g3
  • Offline
  • Contributing Member
  • Contributing Member
  • Posts: 464
  • Karma: 62
  • Thank you received: 2
So, now that all the foam and wood looks good there are a few things that needed to change before the glass work starts.
Under deck access was zilch due to ski locker in the middle and fixed foot rests on either side. This was demonstrated rather dramatically where I shinnied up inside the center ski locker (about 13 inches wise, 18 inches tall,
good thing I'm skinny!) to access the loose bow eye nuts. Quite an ordeal to tighten but, I discovered another flaw, the backing wood on the eye just bridged across the bow V so as you tightened the wood just deformed, it was clear that in time this would become loose again. One fortunate thing was the V shaped space below the wood was open so there would be a ready made space to fill with thickened epoxy and chopped glass filler, so out came the bow eye. I felt like I was spelunking in the locker as one had to twist and contort and was always laying on some needed tool.
The boat has near zero space for life jackets paddles etc. The area under the deck would be perfect so although I value originality, modification would be needed. I like the console look of the locker so I decided to retain the cockpit portion but, remove the unseen walls extending up under the deck, this would open up the whole bow area and facilitate tiding up some of the poor glass work and fixing the before mentioned drain holes. Leaving this feature meant only shinnying through the opening for any needed under deck adventures so I trimmed a piece out of each footrest so I could now squeeze in from each side. This lead to the idea of removeable foot rests which would give unfettered access when needed. The picture shows the foot rests and the locker space I had to shinny into, the locker extended all the way up to the bow, so there were three discrete areas under deck.
Attachments:

Please Log in or Create an account to join the conversation.

Re:GT160 resto or What you do on a minty barn find 7 years 4 months ago #128825

  • 63g3
  • Offline
  • Contributing Member
  • Contributing Member
  • Posts: 464
  • Karma: 62
  • Thank you received: 2
So after trimming, grinding sawing etc all still a bit awkward working under the deck but at least now made possible the desired result took shape. I left the ends of the original footrests in place to be the mounts for the removeable ones.
And now I had one large area under the deck for storage.
Attachments:

Please Log in or Create an account to join the conversation.

Re:GT160 resto or What you do on a minty barn find 7 years 4 months ago #128826

  • 63g3
  • Offline
  • Contributing Member
  • Contributing Member
  • Posts: 464
  • Karma: 62
  • Thank you received: 2

Please Log in or Create an account to join the conversation.

Re:GT160 resto or What you do on a minty barn find 7 years 4 months ago #128827

  • 63g3
  • Offline
  • Contributing Member
  • Contributing Member
  • Posts: 464
  • Karma: 62
  • Thank you received: 2
And here are removable foot rests shown placed in position. A few other things to note are the small block bonded to the floor to support the front locker panel and I bonded a round block into the dash to help facilitate hole sawing a larger hole for a different gauge. You may also see I cut a round opening under the deck I'll cover that thinking as work progresses.
Attachments:

Please Log in or Create an account to join the conversation.

Re:GT160 resto or What you do on a minty barn find 7 years 4 months ago #128840

Excellent!!!!!!!!!!

Bob

Please Log in or Create an account to join the conversation.

Re:GT160 resto or What you do on a minty barn find 7 years 4 months ago #128841

  • Nautilus
  • Nautilus's Avatar
  • Offline
  • Contributing Member
  • Contributing Member
  • Posts: 1574
  • Karma: 87
  • Thank you received: 58
I restored a GT160 about 10 years ago. I loaded it up with mahogany on the interior as well as the front and rear decks. Everyone seemed to like it...even the die hard Glastron guys.

I don't mean to hijack the thread...just thought you might like to see an "alternative restoration."


Please Log in or Create an account to join the conversation.

Website: NautilusRestorations.com

Mentor to the unenlightened!

"Never allow logic to interfere with a boat purchase." - J. S. Hadley
"Vintage quality beats new junk every time." - J. S. Hadley
"Anything supposed to do two things does both of them half-assed." - J. S. Hadley
"Success makes...

Re:GT160 resto or What you do on a minty barn find 7 years 4 months ago #128848

  • 63g3
  • Offline
  • Contributing Member
  • Contributing Member
  • Posts: 464
  • Karma: 62
  • Thank you received: 2
Doc...yup gotta have a nice place to hang the next Merc! Oh, I heard a good one to go with the "tower of power" nick name it goes "tall dark and handsome hang in' on the transom" ..ha.
Nautilus, not nit picking but that's a GT 150 not a 160 you have..which by the way is OUTSTANDING.
I have a glass Resorter in the que that instead of making it correct I'm gonna do sort of a resto/vintage/mod which means as much wood trim as is reasonable, I like what ya did! As always, great work, I'm still a novice at good wood joinery.
More on the GT refurb coming.
Randy

Please Log in or Create an account to join the conversation.

Re:GT160 resto or What you do on a minty barn find 7 years 4 months ago #128904

  • 63g3
  • Offline
  • Contributing Member
  • Contributing Member
  • Posts: 464
  • Karma: 62
  • Thank you received: 2
So at this point I've got the bow area mods done. Moving from front to back the next stop was the cockpit area.
Not much to do here as I am trying to maintain originality but still a few details to tend to.
A frequent missing feature of the GT 160 are original bucket seats, this fortunately had them and were un molested and in great shape. However it is readily apparent why these are nearly always missing, an odd design, flimsy materials and poor anchoring. I'll address what I did to improve the seats themselves on a later thread so just going to review the improved anchoring.
The seats where lagged into the plywood floor, Glastron did triple layer the floor in the seat area to give enough thickness for the lags to bite but I have to tell ya I'm a through bolt kind of guy so not re al happy with lags. The other issue is for any future under dash work maintenance etc. no matter how infrequent, one of the buckets has to come out to facilitate access. This means unscrewing the lags over and over which is less than ideal. Also, to further complicate repeated removal is the lags should be sealed to prevent any cockpit water from wicking in.
I decided a good approach would be using blind nuts on the underside of the floor which would give me machine threads, rather than lags. I drilled out the lag bolt holes and using the previously drilled inspection holes around the seat base l used a bracket with the nut double face taped to it to fish it under the seat area.
I put a few doll ups of epoxy on the nut prongs as a precaution to help hold them in once installed. Once the nut was lined up, I threaded a rod into it then with a nut and washer, I pulled the nut up into the plywood underside to complete the install.
Attachments:

Please Log in or Create an account to join the conversation.

Re:GT160 resto or What you do on a minty barn find 7 years 4 months ago #128948

  • 63 Sabre
  • 63 Sabre's Avatar
  • Offline
  • Contributing Member
  • Contributing Member
  • Posts: 4676
  • Karma: 147
  • Thank you received: 167
Several years ago I did almost the same procedure with my Shell Lake Executive during a rebuild. Drilled the same holes in the deck etc. One word of caution when you use those T nuts. I used epoxy to glue them under the hole but when you finally insert the stainless/brass bolts for the seating be careful and cautious. Those nuts can be pushed out. Take your time and be gentle. I have lost some of them in the new bilge and had to resort to large butterfly nuts, the kind used to hang large heavy objects on a wall.

Please Log in or Create an account to join the conversation.

Re:GT160 resto or What you do on a minty barn find 7 years 4 months ago #128949

  • 63g3
  • Offline
  • Contributing Member
  • Contributing Member
  • Posts: 464
  • Karma: 62
  • Thank you received: 2
Ha, great call on the T nuts, (that's why this site is great, all this shared experience) I've lived through the dreaded clink when they drop into the inaccessible underside!....UGH. Given that........
I'm doing a few things this time around one was the epoxy and I'm going to use stainless threaded rods to make correct length studs. These will be threaded down, touch the hull the thread back up to leave an inch plus clearance. I will then spin on those plain round T nuts on the top side which would pull the stud up and would clamp the T nuts in place, this gives a flush top and then the seat mounts as usual. I'm a belt and suspenders on this detail exactly for your concern. I'll use wing nuts to tighten seat base down making for tooless removal of the seat in the random times when needed.
Now I'm still moving back in the boat to the rear. I decided that the 1150 should have power trim/ tilt, to keep it correct, this is the pump in the boat two ram bracket style system. I scrounged around in my "inventory" for all the bits and pieces. Frankly this set up is a huge pain in the butt to install and rig the later in the bracket systems are sooooo much neater easier to deal with but that's the 80's not the 70's!
The biggest problem was there was no place to put the pump and keep two tanks and battery in back of the seat.
I decided it would be best to mount the pump on the opposite side from the battery to help weight balance so the only real option was to modify the rear to make space to mount the pump.
Glastron made two boxes, one on each side of the transom, bounded on two sides by plywood with the transom and the hull side for the other two sides, then they filled them with pour in foam. This effectively makes for fairly stout transom knees and added floatation to help float the motor in case of some catastrophic event. It's all under the back deck so it is pretty well protected from water entry as long as the box is water tight.
I notched the passenger side box as shown fitting pump to make sure of clearances and access to needed parts, hoses and fill plugs. Still pretty tight but workable. The pump can't get too far away as the PIA (pain in the patouty) hydraulic lines have limited reach.

Now the new 3 sided wood corner was cut and fit. I used a similar pronged T nut and stud arrangement as done on the seats for the mounting points to instal the pump. All corners radiused to help glass conforming.

Then I glassed it al in wth biaxial and thickened epoxy to radius inside corners as shown along with the refurbished battery tray gassed in on the other side.
It's getting chilly at night so, after the days work, I put the mooring cover on and run the heater to keep things warm for curing.
Attachments:

Please Log in or Create an account to join the conversation.

Re:GT160 resto or What you do on a minty barn find 7 years 3 months ago #129087

  • 63g3
  • Offline
  • Contributing Member
  • Contributing Member
  • Posts: 464
  • Karma: 62
  • Thank you received: 2
So now all the mods are done and time to turn the page from destruct, to construct. I started by plugging the
Inspection holes with the original cut outs. I slathered the hole and the plug with epoxy resin, (this helps the wood bond better to thickened material) then buttered the plugs with epoxy thickened with colidal silica, this prevents sagging as it resists shear flow so it won't run out of the joint. I used youngest depressors to keep the plugs in place level to floor during cure.
Here are pictures before the bonding is done.


Eventually they look like this when cured sanded down and glassed over.
Attachments:

Please Log in or Create an account to join the conversation.

Re:GT160 resto or What you do on a minty barn find 7 years 3 months ago #129179

  • 63g3
  • Offline
  • Contributing Member
  • Contributing Member
  • Posts: 464
  • Karma: 62
  • Thank you received: 2
I'm gonna start at the transom and work forward on this phase of glassing sealing rebuilding. This allows some motor, steering hardware rigging to go on around the transom area while I can also do glass work more forward on the boat. I use 4 and 6 inch biaxial tape to glass the drain well sealing covering and reinforcing to make perfect well, no place for standing water to wick into transom or into the underfloor area, only the drain tube hole remains. I make sure I carry the tape up and over from the well to the tank area floor so I'll have plenty of overlap whe I glass the floor and transom areas with larger glass sections. Once all cured I make sure there is a nice flat around the drain hole to promote sealing the drain tube as I'll detail in a bit.
For all the holes in the transom I overdrill the 3/8 holes 1/32 larger to clean to bare wood. For the drain plug tubes I grind the wood portion of the hole a bit oversized with a dremel tool, this gives space for sealants and epoxies to reside and not get wiped off by a tight hole when pieces are installed.Care must be taken around the drain tube area to leave the fiberglass outer skin hole un touched as the drain tubes have precious little flange to seat and cover the hole, this makes for a neat install when done.
I first let epoxy resin wick into the wood and keep feeding it till it doesn't take anymore. I use West System for my glass work but in this instance I use 2 related products they make as they formulated to be more flexible and are designed more towards bonding rather being used in conjunction with glass. I want to keep with similar chemistries so I went with West g-flex resin and a thickened version of the same. I wick in the g flex epoxy using q-tips on all the holes and keep feeding till no more is taken up.
The bolt holes, at this point, I let cure.
The drain tubes are a little more involved. What I'm trying to do is isolate the wood with a layer of the thickened g-flex between the wood and the drain tube itself, the tube is kinda floating in a plug of epoxy. I also pay attention to the outer flange area to make sure epoxy gets under the flange to help seal as well. On the inside of the boat, the manufacturers had a tool to swage the tube tight by forming another small flange, this inside flange Is not really sealed so lots of space for wicking bilge water into the wood on original.
So what I do is to make a flange for the inside, I have one machined that slips into the tube, picture below

And what it looks when slipped in place

All the brass surfaces that would be bonded are roughed up to promote bonding, I also find roughing up where the drain plug installs helps hold it in, I have seen these rubber plugs want to get pushed out as you tighten them so a rough surface helps from happening.
So the wicked in g-flex has not cured yet so I continue on by slather on the thickened version of the g-flex around the tube and in the hole, I instal using a twisting motion to keep the gap between the tube and the wood full of epoxy to form a complete sealed barrier around the wood and bond in the tube. I make sure ooze is seen around the outside flange too. Now I install my inner flange making sure epoxy gets around the tube and oozes out around the flange. I wipe off excess outside and inside and let it mostly set up before detail cleaning excess off the outside flange area so cosmetics on transom outside is good by removing un wanted excess without removing the desired.
I do the motor well in a similar fashion with particular care around the motor well side as water sits there. The motor well in this case was a separate molded area of the deck portion and it was bonded to the transom inside where motor clamps when deck was assembled on. However, one could see small gaps beetween the transom and this glass inner piece, so I loaded up a syringe with thickened epoxy and injected it to fill this gap completely so locally to the hole the transom and motor well where well sealed and bonded together. From there I installed the tube and machined flange. The machined flange gives a nice finish to the motor well to boot.
I wait a day or so before installing the rest of the transom hardware, to make sure the wicked in gflex is cured and I use 5200 on bolts eyes etc. the slightly oversized holes help give space chord a nice layer of sealant.
Now I can move onto glass floor work and motor related rigging.
Attachments:

Please Log in or Create an account to join the conversation.

Re:GT160 resto or What you do on a minty barn find 7 years 3 months ago #129489

  • 63g3
  • Offline
  • Contributing Member
  • Contributing Member
  • Posts: 464
  • Karma: 62
  • Thank you received: 2
The boat glass work was done starting at the stern. I try to do continuos side to side, this boat will be done in three overlapping sections front to back. The stern area has lots of corners and nooks and crannies so I take to taping with 6 inch biax then overlaying overlapping larger biax sections of mat. I grind radius outside corners and fillet inside corners so mat lays down tight in these areas. When all was cured where this area of the boat gets no carpet I mixed up some resin with black color and "painted" it all black.
Attachments:

Please Log in or Create an account to join the conversation.

Re:GT160 resto or What you do on a minty barn find 7 years 3 months ago #129490

  • 63g3
  • Offline
  • Contributing Member
  • Contributing Member
  • Posts: 464
  • Karma: 62
  • Thank you received: 2
So I need a break from the glass workand moved to some rigging. I'll put the stern trim on and start motor rigging.
First I wet sanded and buffed the gel in the stern area as it is easier to do this with trim off and no rigging.
As a side note, I am going through the motor and generally treat it in three sections, the powerhead, mid and the lower unit. I rebuild and paint each of these then combine them. I mount the mid to the boat then add the lower unit and then drop on the powerhead. I have found this makes for easier assembly and rigging on a ground up resto.
Where this boat did not have power trim, some new holes had to be drilled in the transom and exposed wood sealed with epoxy. To make this easier , I used the now reconditioned clamp bracket assembly and trim stuff. It makes locating and drilling easier due to easy handling of the smaller assembly.
Here it is positioned with holes drilled, bolts and clamp pad fitted. Rear trim is on. I also drilled the hole for the trim hoses and wire routing. Once that's done the clamp bracket comes off so I can assemble and final paint the mid complete for final mounting. The wood exposed has been sealed with epoxy as detailed earlier. Again I made the holes slightly oversized to allow room for the 5200 to seal the bolts at install.
Note I use the silver RTV when mounting the trim as it not only seals but visually minimizes any gaps where it closely matches the aluminum trim. You can also see the brass flange in the drain hole of the motorwell, that was explained on a previous post but here it is all installed.

Attachments:

Please Log in or Create an account to join the conversation.

Re:GT160 resto or What you do on a minty barn find 7 years 3 months ago #129491

  • 63g3
  • Offline
  • Contributing Member
  • Contributing Member
  • Posts: 464
  • Karma: 62
  • Thank you received: 2
And here is the mid complete and bolted on, trim lines all set.
Attachments:

Please Log in or Create an account to join the conversation.

Re:GT160 resto or What you do on a minty barn find 7 years 3 months ago #129492

  • 63g3
  • Offline
  • Contributing Member
  • Contributing Member
  • Posts: 464
  • Karma: 62
  • Thank you received: 2
Now steering and bezels are in place, note steering runs under trim hoses for good clearance without kinking anything.

And here are tanks placed and trim pump mounted. At this point I hot wired the trim system and bled it so, it's ready to go. It's a squeeze but everything fit and played well together given space constraints.
Now back to glassing..... j
Attachments:

Please Log in or Create an account to join the conversation.

Re:GT160 resto or What you do on a minty barn find 7 years 3 months ago #129504

  • 63g3
  • Offline
  • Contributing Member
  • Contributing Member
  • Posts: 464
  • Karma: 62
  • Thank you received: 2
So here is biax layer out and trimmed. You can see it runs up at the sides with a generous fillet done to eliminate the sharp corner. I have a generous overlap with the completed rear section. Where the cured rear glass work stopped I feather the edge so there is no bump at the overlap. Overlaps are done in shingle fashion rear to front. Around the raised seat bases and the ski locker walls I've already glasses the corners with 6 inch biax so I have overlap and continuous glass/ epoxy in these areas as well.
I have put small pieces of tape over the seat bolt holes so no epoxy runs down clogging up the threads of the previously installed inserts. This allows easy trimming to clear the bolt holes after cure.
I roll up half of the placed and trimmed glass so I don't loose it's positioning, this rolled up area will be resigned up first.
So now I'm good to go, I mix up a batch of slow cure epoxy and wet out the floor in the area where I will roll the glass back this sticks it in place, in a short time the glass absorbs and starts to go see through. I can now do the other half in similar fashion. As the glass soaks up the resin I keep feeding in new mixed resin from the top and squeegee. I continue till everything is shiny and bubble free.
Basicly in my mind I am trying to make a continuous tub for the cockpit that drains into the sump in the gas tank area where the drain plug is. Once cured I'll feather this new layer where it stops being very carefull not to cut into the previous layer below.

Now here it is cured. You can see the tape over the bolt holes for the front seats and I mixed up some blackened epoxy to paint around the drivers seat pedestal as some of this might show when carpet is trimmed around this feature.
You can also see the white fillet in the inside corner along the length of each side.
Attachments:

Please Log in or Create an account to join the conversation.

Re:GT160 resto or What you do on a minty barn find 7 years 3 months ago #129516

Excellent progress! Great step in the motor mounting and restoration.

Bob

Please Log in or Create an account to join the conversation.

Re:GT160 resto or What you do on a minty barn find 7 years 3 months ago #129530

  • 63g3
  • Offline
  • Contributing Member
  • Contributing Member
  • Posts: 464
  • Karma: 62
  • Thank you received: 2
Thanks Bob! I am doing this write up with about a month delay, I was bucking to get everything done except the powerhead before weather really changed.
I know this is not a major restoration and may not be that enlightening as a deck off resto but, over the years I have found it's the niggly details on the construction side that come up again and again. I have gleaned many a tip from the site, some good, some may be bad but, all thought provoking and worthy of consideration so I thought it worth posting how I dealt with the shortcomings.
I've done quite a few boats and generally too darn absorbed in the doing to stop and take pictures so I never have a story to tell.
It took some time to build the enthusiasm to do the awkward glass work remaining under the front deck so I did some glass work needed on bits and pieces as a lead up to the last push on the boat itself.
Pictured are the removeable foot rests and a plastic cover that hides the drivers seat raised plywood base.
I cut the glass oversized and the trim once cured.

And here after cure, I trim the overhang and do final edge cleaning with the grinder.
Attachments:

Please Log in or Create an account to join the conversation.

Re:GT160 resto or What you do on a minty barn find 7 years 3 months ago #129531

  • 63g3
  • Offline
  • Contributing Member
  • Contributing Member
  • Posts: 464
  • Karma: 62
  • Thank you received: 2
I still was not excited about doing the under deck glassing so I went to work on the seat buckets.
The front bucket seats are an odd design, it's not the expected glass bucket with a back and bottom of upholstered plywood. The bucket itself is just a super thin vacuum formed piece of plastic. What you think is the rigid seat shell is just there to provide the illusion of a traditional bucket seat. It really is a back and a bottom bolted onto an inner frame for the structure of the seat. The vacuum formed shell is just that, it adds no support or strength only cosmetics.
These seats are very rare to find, I never understood why but, it is easy to see that over a 40 year span of time these vacuum formed shells disintegrate and get discarded. The frame and floor attachment of the frame start to loosen over time which starts to bend the shell, this accelerates as floors and seat base gets wet and rot sets in. The flimsy shell just can't take any loads or impacts that occur once the inner frame and mounting aren't taking 100%
You'll see below the shell and the inner frame. I could mount the seat frame with the back and bottom without the shell and it would work perfectly fine as a seat it just would not look as good.
The picture below shows the shell AFTER I glassed it on the inside to strengthen the vacuum formed plastic.
This leaves the seen outside as original but is significantly strengthened.


And here is how the upholstered top and bottom withe the frame really makes the seat itself.
And here is that assembly above is placed "inside" the bucket they only contact at the bottom where the bolts sandwich the shell and bottom of the inner frame.

This all seems complicated and might indicate the relative cost of making a glass bucket and mounting is more expensive than theses multiple non glass parts...I dunno...maybe it was just a dumb decision to do it this way.

Please Log in or Create an account to join the conversation.

Re:GT160 resto or What you do on a minty barn find 7 years 3 months ago #129546

  • Dr.Go!
  • Dr.Go!'s Avatar
  • Offline
  • Contributing Member
  • Contributing Member
  • Posts: 1719
  • Karma: 19
  • Thank you received: 125
I really appreciate your informative post. It has helped explain many finer details of the glassing and solutions. I am finding this both useful and a lesson in history as I always wondered how that glass shell could hold up the stress (as now you show it has a stress carrying inner skeleton). I am very tall from the waste up so I am always concerned with how seats handle the stress of them only hitting the middle of my back. Though my set up is different, I will pay attention to stress and water entry problem areas.

This is an encouraging read and will help me get ready for this winter and next summer's restoration. I am trying to do the "picture taking" thing along the way, but I have to make that extra effort to stop and document...I am sure easier said than done.

Please Log in or Create an account to join the conversation.

Dr.Go!

Re:GT160 resto or What you do on a minty barn find 7 years 2 months ago #129558

  • 63g3
  • Offline
  • Contributing Member
  • Contributing Member
  • Posts: 464
  • Karma: 62
  • Thank you received: 2
OK time to squirm and contort for under deck work.
As a preamble a few things were under consideration. One was the area under the floor needs vent tubes to balance air pressure as boat warms up and cools. Secondly it would be nice to have the ability to inspect and air out the underside area. Both of these need to be done in a way so as not to provide an easy path for stray water to find its way under the floor. Keep in mind where this floor is original, the underside of the plywood is still unfinished so even after all the previous work to keep the underfloor area dry I can't make it 100% sealed.
The vent tubes were easy enough. I used pvc conduit about a foot long with elbows at the top. These were bedded in epoxy and glassed were they penetrated the floor. These were located under the deck placed in existing drain holes right behind the foot rests. That was a perfect place to run the tubes up against the ski locker walls. Unless water depth IN the boat gets over a foot no water could get in here.
I decided to put a large screw top with o ring sytle inspection port in. This would seal when tightened.
I would bridge it across the main center stringer so both "sides" of the underfloor would be accessible. The port is located under the bow with easy access through the ski locker opening, this way it would not be seen, be less vulnerable to rain and spray etc yet still be positioned to be useful. I also made a raised boss for the port to sit on so it would be above floor level. Both the sealing and It being raised would minimize risk of water dribbling in
from a wet floor.
Below I point to the existing vent holes

And here is the hole for port and vent tube fit checked
Attachments:

Please Log in or Create an account to join the conversation.

Re:GT160 resto or What you do on a minty barn find 7 years 2 months ago #129559

  • 63g3
  • Offline
  • Contributing Member
  • Contributing Member
  • Posts: 464
  • Karma: 62
  • Thank you received: 2
With these details settled I cut and fitted the glass under the deck mixed up some resin and went to work. I'll trim when cured around the vent holes and the port hole.
I will start on the vent tube glassing in and fabricating the raised boss for the port.
Progress pic below you can see the white vent tubes an elbows running up the back side of the locker walls
And with the port cover and flange placed to check fit. Now that I'm wiggling under the dash frequently, I'm also final fitting the removeable foot rests to my liking.
Attachments:

Please Log in or Create an account to join the conversation.

Re:GT160 resto or What you do on a minty barn find 7 years 2 months ago #129560

  • 63g3
  • Offline
  • Contributing Member
  • Contributing Member
  • Posts: 464
  • Karma: 62
  • Thank you received: 2
Now I do final glass work on the raised boss. To make sure the area where the port flange would seal and screw to would be flat I placed a flat pice of plywood covered in wax paper with a small weight on top before cure.
Attachments:

Please Log in or Create an account to join the conversation.

Re:GT160 resto or What you do on a minty barn find 7 years 2 months ago #129562

  • 63g3
  • Offline
  • Contributing Member
  • Contributing Member
  • Posts: 464
  • Karma: 62
  • Thank you received: 2
I now give the under bow area a coat of blackened resin. Then once black top coat is cured I install the port flange sealing it to the raised boss. The carful observer will see I also have drilled the second hole in the dash to correct size. I took advantage of the times under the deck to also glass and reinforce the behind the dash area much more rigid than originally to support steering etc.
Oh, the glass work is DONE! No more measuring, mixing, gloves, tyvek suits etc.
I like glass work but it gets tedious near the end after working with it so much.

I fitted the insruments and the helm and now I'm now ready to carpet.
Attachments:

Please Log in or Create an account to join the conversation.

Re:GT160 resto or What you do on a minty barn find 7 years 2 months ago #129563

  • 63g3
  • Offline
  • Contributing Member
  • Contributing Member
  • Posts: 464
  • Karma: 62
  • Thank you received: 2
One thing about epoxy is once cured it leaves a film on the surface "blush" that needs to be removed before any subsequent layers will bond. Surfaces need to be sanded which I do anyways to denub and smooth but, the surface needs to be washed and wiped clean too, a pain for sure but, I feel it's worth this downside where epoxy is a superior material considering its bonding strength and it is less permeable to water than polyester.
Other advantages are control over cure and it does not SMELL! But all this is just my humble opinion, many a good job is done using polyester based resins!

Please Log in or Create an account to join the conversation.

Re:GT160 resto or What you do on a minty barn find 7 years 2 months ago #129564

  • 63g3
  • Offline
  • Contributing Member
  • Contributing Member
  • Posts: 464
  • Karma: 62
  • Thank you received: 2
OK fun times now...I get to put the carpet down...very exciting...really! I found some AstroTurf in blue/grey very close to original to use.
I cardboard template the front cuts around the locker area and start the carpet bonding there. I use aerosol contact glue for this.
Here is the front with locker and lower side storage upholstery trim being fiitted, I also am checking fit of the removeable foot rests now that they are carpeted.

And looking stern

Please Log in or Create an account to join the conversation.

Re:GT160 resto or What you do on a minty barn find 7 years 2 months ago #129565

  • 63g3
  • Offline
  • Contributing Member
  • Contributing Member
  • Posts: 464
  • Karma: 62
  • Thank you received: 2
The last few details before everything gets fastened.
Here are the studs that thread into the inserts installed long ago. To keep the underside inserts from dislodging
I screw on plain inserts from above, this sandwiches everything tight and gives me the studs to bolt the seats to. e
Attachments:

Please Log in or Create an account to join the conversation.

Re:GT160 resto or What you do on a minty barn find 7 years 2 months ago #129566

  • 63g3
  • Offline
  • Contributing Member
  • Contributing Member
  • Posts: 464
  • Karma: 62
  • Thank you received: 2
The final pieces are added.
I put some deck supports in right where people step when entering the boat. It's the small area just behind the windshield. The deck is not really supported for this and although it would not break, it would flex risking gel spider cracking. I had earlier glassed in wood backing to which I could mount some braces to, when the back seat is down in position these braces are not seen. Overkill maybe but I have seen spidering as a common occurrence on boats with similar windshield arrangements where stepping on the deck just behind the windshield as the only option when boarding. I did something similar to my Hydrostream resto years earlier.
So an ounce of prevention.
Attachments:

Please Log in or Create an account to join the conversation.

Re:GT160 resto or What you do on a minty barn find 7 years 2 months ago #129567

  • 63g3
  • Offline
  • Contributing Member
  • Contributing Member
  • Posts: 464
  • Karma: 62
  • Thank you received: 2
I've gone as far as I can, the days of mid 50's have ended cold air is on its way. I'll shrink wrap it.
I'll do the powerhead this winter and refurbish the throttle shift control. My goal was to have everything done so in the Spring its drop on the powerhead bolt in the control and be ready for summer.
I made it barely, but made it. The work started in late Aug and I finished up the first week of Dec. note snow on ground. Despite the snow and December finish the Fall in Massachusetts was a mild one with many days in the mid 50's right up to the end which allowed me the time to get this far...the following weekend temps dropped into the teens for a few days...nutty New England weather.... whew.
Here are a few shots just before shrink wrapping.
Attachments:

Please Log in or Create an account to join the conversation.

Re:GT160 resto or What you do on a minty barn find 7 years 2 months ago #129568

  • 63 Sabre
  • 63 Sabre's Avatar
  • Offline
  • Contributing Member
  • Contributing Member
  • Posts: 4676
  • Karma: 147
  • Thank you received: 167
I feel the pain of crawling under those bow areas. Seems no matter how far you plan in advance and get all the tools and supplies ready to be handy while you're under there you will miss something and be forced to do the shimming and schootching and crawling out. Project looks beautiful, hope it stores well over the cold weather. I was fortunate to be able to store my boats indoors so I was able to put a small blower in the access hole to circulate air on a timer.

Please Log in or Create an account to join the conversation.

Re:GT160 resto or What you do on a minty barn find 7 years 1 month ago #130435

Oh so beautiful!

Please Log in or Create an account to join the conversation.

  • Page:
  • 1
Time to create page: 0.409 seconds

Donate

Please consider supporting our efforts.

FG Login

Glassified Ads

1975 16ft Cobalt
( / Boats)

1975 16ft Cobalt
03-27-2024

Homelie/Bearcat
( / Engines)

noimage
03-17-2024

Thunderbird Apache 1956 hardtop
( / Boats)

noimage
03-10-2024

FiberGoogle

Who's Online

We have 7800 guests and no members online