Welcome, Guest
Username: Password: Remember me

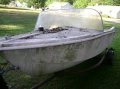
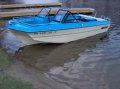
TOPIC: 1959 Lake N' Sea Restoration

Re:1959 Lake N' Sea Restoration 12 years 3 months ago #51511

  • Andgott
  • Andgott's Avatar Topic Author
  • Offline
  • Contributing Member
  • Contributing Member
  • Posts: 1243
  • Karma: 72
  • Thank you received: 0
The floor is in-


It's bonded to the tops of the stringers, with some stainless screws used to hold it in place while it cures. Once everything is cured, I'll fillet & tape the joint all the way around, then put a layer of glass over the entire thing. I've got 60" wide cloth, so I'll be able to go from gunwale to gunwale with one solid piece.

Then- It'll be time to flip it over!

Please Log in or Create an account to join the conversation.

Re:1959 Lake N' Sea Restoration 12 years 3 months ago #51525

Looking good Andrew. With a solid piece from gunwale to gunwale will make that a very solid floor. She shouldn't budge at all, very nice!

Bob

Please Log in or Create an account to join the conversation.

Re:1959 Lake N' Sea Restoration 12 years 3 months ago #51562

  • Andgott
  • Andgott's Avatar Topic Author
  • Offline
  • Contributing Member
  • Contributing Member
  • Posts: 1243
  • Karma: 72
  • Thank you received: 0
A nice, warm day down here... The joint has now been filleted, and taped-


There was only a small gap, I used a grinder on the edge of the floor while it was still out of the boat so there would be a little more area to fill. I wanted about a 1/8" or more gap as a minimum. I filled it with epoxy, thickened with aerosil. Then, I taped the top of the joint with 3" glass tape.

The second photo shows one of the handiest 'features' of my workshop- My Solar door. I happen to have a south facing garage door, and I built a swing-down door that covers it up, kind of like a storm door. The inserts are clear polycarbonate panels, and they act as solar collectors during the winter. I open my garage door, and let the free heat come in. It is seldom below 70 down there, even on the colder days. My shop does have heat, but I don't even need it 90% of the time!

The door is hinged on the top, so I swing it up to use the door. If I prop it in the open position, it 'extends' my work area out into the yard a bit, by giving me an awning to work under. The sun isn't a problem in the summer months, as it's higher in the sky, and also blocked by leaves on the trees, which are of course gone now...

-Andrew

Please Log in or Create an account to join the conversation.

Re:1959 Lake N' Sea Restoration 12 years 3 months ago #51566

  • Shelby18
  • Shelby18's Avatar
  • Offline
  • Contributing Member
  • Contributing Member
  • Posts: 436
  • Karma: 18
  • Thank you received: 0
Your project is progressing nicely. The garage door set-up is brilliant.
With all of the projects going on, this forum has me hooked. So glad I joined up!

Please Log in or Create an account to join the conversation.

Great to be on board.
Rick

Re:1959 Lake N' Sea Restoration 12 years 3 months ago #51594

andrew ,excellent thread,your doing a fantastic job,im learning a WHOLE lot,great idea on the garage door,hmmmmmmmmmm.got me thinking,john

Please Log in or Create an account to join the conversation.

\"too soon old,too late smart\" my pap

Twenty years from now you will be more disappointed by the things that you didn’t do than by the ones you did do. So throw off the bowlines. Sail away from the safe harbor. Catch the trade winds in your sails. Explore. Dream. Discover.“

---Mark Twain

Re:1959 Lake N' Sea Restoration 12 years 3 months ago #51596

  • Andgott
  • Andgott's Avatar Topic Author
  • Offline
  • Contributing Member
  • Contributing Member
  • Posts: 1243
  • Karma: 72
  • Thank you received: 0
Thanks, John...

This article details the door-

www.builditsolar.com/Projects/SpaceHeating/SolarGarageCollector/HP117_pg26_Reysa.pdf

I was AMAZED at how much heat I get from the thing... It goes from chilly to a nice balmy 70 in a very short time, and the sun warms the slab, which keeps it warm all night while the epoxy cures.

Please Log in or Create an account to join the conversation.

Re:1959 Lake N' Sea Restoration 12 years 3 months ago #51600

  • 63 Sabre
  • 63 Sabre's Avatar
  • Offline
  • Contributing Member
  • Contributing Member
  • Posts: 4676
  • Karma: 147
  • Thank you received: 167
Andrew, great progress. Floor is lookin' good. Garage door is neat also. Mine faces north and even with the sun at full bloom I never see it inside. One advantage though is during the hot summer days it's the coolest. Temps getting a bit cool in my area now, in the 20's and teens for the weekend with snow predicted.
Attachments:

Please Log in or Create an account to join the conversation.

Re:1959 Lake N' Sea Restoration 12 years 3 months ago #51669

  • Andgott
  • Andgott's Avatar Topic Author
  • Offline
  • Contributing Member
  • Contributing Member
  • Posts: 1243
  • Karma: 72
  • Thank you received: 0
The glass work on the floor is now DONE-


I HATE glassing areas that big! Getting it all wet out and bubble free is a pain... Being a little cooler helps, since I get a bit more working time with the epoxy, but you still have to go FAST.

First step was wiping the blush off the cured resin. I've noticed that the epoxy I use tends to bush a lot more in cooler temps (as do most epoxies), especially with the 'medium' hardener. All it requires is a good wipe down with hot, clean water. Then, I did some light sanding in a few areas to knock down some high points.

I cut the cloth so it conforms to the molded in rub rail- it makes it a lot easier to 'blend' into the existing hull. Once the edge is sanded a bit, You'll have to look VERY close to tell that any changes have ever been made.

There is one piece of glass running from gunwale to gunwale, but I chose to wet it out in 2 sections- One runs from the bow to about 6 feet back, and then I overlapped that with another piece that runs to the transom. The joint is hidden underneath the forward seats, so you'll never see it. I did this because it is a lot easier to manage two smaller pieces of glass than it is one large one!

When I'm working with larger pieces of glass, I break out the 'glass table', which is just a luan door that I picked up on clearance at lowes since it had a ding in one side... It works great for cutting fiberglass, vinyl, anything large-


I folded the 60" wide cloth in half, to make it easier to deal with, and then drew a line down the center with a marker... I've also got a line down the center of the boat- So when I go to lay the cloth in place, I can just match the two lines up and wet it out from the center outwards.

I am GLAD to get this behind me- It's a lot of work :)

This is a 'milestone' of sorts in the project- Now that the floor is back in, the major repair work is complete. Now, It's filling, fairing, and sanding in preparation for paint.... Then putting it all back together (and hoping it all fits!!)


-Andrew

Please Log in or Create an account to join the conversation.

Re:1959 Lake N' Sea Restoration 12 years 3 months ago #51670

  • MarkS
  • MarkS's Avatar
  • Offline
  • Moderator
  • Moderator
  • Posts: 5348
  • Karma: 118
  • Thank you received: 5
Major milestone in my book Andrew, (the floor) looks great. I remember the day I put the last layer of glass down on the floor of the GT, in one piece. Felt like I'd been chased all day then hit by a Mack truck! I like the two pieces idea a lot better, I'll know better next time. You're making awesome progress, and we really appreciate you sharing your methods and tips/tricks with us. ;)

Please Log in or Create an account to join the conversation.

Mark

Re:1959 Lake N' Sea Restoration 12 years 3 months ago #51673

  • Andgott
  • Andgott's Avatar Topic Author
  • Offline
  • Contributing Member
  • Contributing Member
  • Posts: 1243
  • Karma: 72
  • Thank you received: 0
Thanks, Mark. Though I was dragging this afternoon, I still had more to do. I just winterized my Glasspar, Packed up my G-3, and started to move boats around to their winter storage locations. My yard looks like a boatyard this year!

I did the floor in my Glasspar Citation in one piece- And it was a pain... When I put the floor in the G-3 Last month, It was only 1/2 the floor- Only about 4' x 5'- and went in MUCH easier- So I did it that way on this boat, too...

Hopefully, I won't be putting any more floors in for a while, though : )

-Andrew

Please Log in or Create an account to join the conversation.

Re:1959 Lake N' Sea Restoration 12 years 3 months ago #51694

Andrew,
Great progress, learning a lot from watching this thread thanks. As far as the floor comment goes, "never say never". :laugh:

Bob

Please Log in or Create an account to join the conversation.

Re:1959 Lake N' Sea Restoration 12 years 3 months ago #52421

  • Andgott
  • Andgott's Avatar Topic Author
  • Offline
  • Contributing Member
  • Contributing Member
  • Posts: 1243
  • Karma: 72
  • Thank you received: 0
Now that the hull is flipped, It's time to start on the bottom. What a mess!!

The hull had been painted at some time in the distant past- Which I didn't realize until I started sanding. It was a well done paint job, but all of it needs to come off. The gel coat underneath is pretty bad in spots, a lot of crazing and cracking. Also, Since I have NO idea what kind of paint it is, the only way to ensure compatibility with the paint I use is to remove it all.

It comes off pretty well, though it's a dusty, nasty process-


This poor girl has had a rough life- There are a lot of chips and gouges in the bottom- Most look like trailering incidents. The old trailer the boat was on was in BAD shape.

The plan is to sand it all down, Fill all the gouges, then prime it with an epoxy primer before painting.

-Andrew

Please Log in or Create an account to join the conversation.

Re:1959 Lake N' Sea Restoration 12 years 3 months ago #52422

  • 63 Sabre
  • 63 Sabre's Avatar
  • Offline
  • Contributing Member
  • Contributing Member
  • Posts: 4676
  • Karma: 147
  • Thank you received: 167
Andrew, teriffic job. I think at one time most of us have been in your position. The filling, sanding, filling again, sanding, priming, sanding, repirming seems like a never ending job. Had to stop my project because of cold weather but you keep me enthused.
Cal

Please Log in or Create an account to join the conversation.

Re:1959 Lake N' Sea Restoration 12 years 3 months ago #52424

  • 63g3
  • Offline
  • Contributing Member
  • Contributing Member
  • Posts: 464
  • Karma: 62
  • Thank you received: 2
Hi Andrew,
Project looks great so far, very well thought out. If I may be so bold as to make a suggestion. It looks like you have removed the drain plug hole that would drain the area below the floor. I think that is a good idea. It also looks like the floor is completely sealed to the hull, also good BUT, as air temp changes the air trapped under the floor will expand and contract so there needs to be a vent tube to allow this to neutralize, otherwise the hull will distort with this pressure building and decreasing (vacuum).
I did my G-3 very similarly to you and eliminated the drain plug to this lower space like you have, the less holes the better. I did note however that the factory put a small plastic vent tube that ran up the bow crease almost to the deck, the other end went into the space below the floor. This would allow the area to normalize the pressure, you might want to do something similar. I also added a screw cover port hole as far towards the bow as it would fit so I had access under if needed for some crazy reason. Where the lid was not quite air tight this provided additional venting even when the lid was on.
Another detail I have been intergrating on my transoms is in the area where the motor bolt holes would go through. What I do is have the right size hole for the bolts in the fiberglass but in the wood portion it is a 2 inch dia hole. I then fill the hole with thickened epoxy and when cured I drill the bolt hole through. This way if the bolt is not perfectly sealed water will not wick into the wood as there is a plug of epoxy protecting the edges.
Just my two cents. I have a 58 L&S in the yard awaiting attention behind the boats I'm working on now.
Keep the updates coming.
Randy

Please Log in or Create an account to join the conversation.

Re:1959 Lake N' Sea Restoration 12 years 3 months ago #52425

  • Andgott
  • Andgott's Avatar Topic Author
  • Offline
  • Contributing Member
  • Contributing Member
  • Posts: 1243
  • Karma: 72
  • Thank you received: 0
Thanks, Randy.

Actually, There is a drain in the 'double bottom'. The idea of a sealed compartment is, in theory, great- But just doesn't work. As you know, water gets in regardless, and without an easy way to get out- causes rot. In addition to the drain plug, I will be adding 2 inspection plates- one in the forward area, and one aft. I didn't install them yet, I want to get the boat back together to make sure that they are in out of the way places, yet still accessible, if that makes sense.

The tip for the mounting holes is a good one- I do ALL the fittings that go through my transom that way. The drain plugs are 1", but I cut the holes 1 1/4", then fill the gap with thickened epoxy. I use a section of PVC pipe as a 'form', the OD of it is the perfect diameter for the drain plug fitting. That way, water will never have a chance to get to the plywood (at least in theory!!).

Glasspar used that 'vent tube' on a lot of different models- It was on the Citation I just did, and is on the G-3 that I'm in the middle of at the moment as well. Originally, Glasspar considered the sealed double bottom to be a safety feature, but I think it becomes more of a problem- Water still gets in, and rots the wood. This really isn't helped by the fact that they used bare wood for stringers, and did nothing to seal the bottom of their floors... When I re-did the floor in both my Citation and the G-3, I integrated a small 'well' near the transom, so the bilge could easily be accessed. I also left an opening in the bow area of the citation, so air can flow through it.

-Andrew

Please Log in or Create an account to join the conversation.

Re:1959 Lake N' Sea Restoration 12 years 3 months ago #52431

  • MarkS
  • MarkS's Avatar
  • Offline
  • Moderator
  • Moderator
  • Posts: 5348
  • Karma: 118
  • Thank you received: 5
Great info on below deck ventilation, draining and transom hole sealing, sincere thanks to you both for sharing your knowledge and techniques on these subjects! Really going to come in handy in the near future (hopefully) on projects. ;)

Please Log in or Create an account to join the conversation.

Mark

Re:1959 Lake N' Sea Restoration 12 years 3 months ago #52467

hi andrew,its just like it says in my signature at the bottom of my post,i learn something everyday,and its because of threads like yours,thanks ,john

Please Log in or Create an account to join the conversation.

\"too soon old,too late smart\" my pap

Twenty years from now you will be more disappointed by the things that you didn’t do than by the ones you did do. So throw off the bowlines. Sail away from the safe harbor. Catch the trade winds in your sails. Explore. Dream. Discover.“

---Mark Twain

Re:1959 Lake N' Sea Restoration 12 years 3 months ago #52468

Excellent information for everyone, that will really come in handy! Thanks.

Bob

Please Log in or Create an account to join the conversation.

Re:1959 Lake N' Sea Restoration 12 years 2 months ago #54675

  • Andgott
  • Andgott's Avatar Topic Author
  • Offline
  • Contributing Member
  • Contributing Member
  • Posts: 1243
  • Karma: 72
  • Thank you received: 0
BACK AT IT!!

We Layed up the ship in Sturgeon Bay, WI this weekend, and I'm back ashore. I am GLAD to get winter sailing behind me- Being 'at sea' this time of year is not fun...

I have been working on the Lake N Sea, and I have the hull ALMOST sanded down now-


This poor girl has had a rough life, though someone did care about her once. The hull had been painted at some time in the past, when I sanded this layer off, the underlying gelcoat was terribly scratched and gouged. It appears that a previous owner was LOUSY at trailering :)

The gelcoat had to be completely removed in places, other places it was in pretty good shape and I could get away with just sanding it down. I used 3-M removal pads on my grinder for most of it, then 60 grit on my random orbit sander... I'll hit it with 120 before I prime.

It's a good thing that it was a nice day and I could do this outside- This is MESSY work!

-Andrew

Please Log in or Create an account to join the conversation.

Re:1959 Lake N' Sea Restoration 12 years 2 months ago #54677

  • Shelby18
  • Shelby18's Avatar
  • Offline
  • Contributing Member
  • Contributing Member
  • Posts: 436
  • Karma: 18
  • Thank you received: 0
Glad to have you back! I love watching the progress on your thread.

Please Log in or Create an account to join the conversation.

Great to be on board.
Rick

Re:1959 Lake N' Sea Restoration 12 years 2 months ago #54682

Andrew,
Welcome back. Glad to see your back safe and sound. Good progress on the hull by the way.

Bob

Please Log in or Create an account to join the conversation.

Re:1959 Lake N' Sea Restoration 12 years 2 months ago #54688

  • 63 Sabre
  • 63 Sabre's Avatar
  • Offline
  • Contributing Member
  • Contributing Member
  • Posts: 4676
  • Karma: 147
  • Thank you received: 167
Hey Andrew, welcome back, glad to see someone else still at it. So you were in Gods country for awhile. I was born and raised, married in Sturgeon Bay, know the place well you might say.
Looking forward to your progress. NOW BACK TO WORK!
Attachments:

Please Log in or Create an account to join the conversation.

Re:1959 Lake N' Sea Restoration 12 years 2 months ago #54690

  • Andgott
  • Andgott's Avatar Topic Author
  • Offline
  • Contributing Member
  • Contributing Member
  • Posts: 1243
  • Karma: 72
  • Thank you received: 0
63 Sabre wrote:

So you were in Gods country for awhile. I was born and raised, married in Sturgeon Bay, know the place well you might say.


Yeah- I like that area a lot... I spent a few months up there this past summer 'overseeing' a refit and some modifications on the vessel that I was working on at the time. I rode my bike 100's of miles all over the Door Peninsula, it's a beautiful area. Not nearly as nice this time of year, though :)

-Andrew

Please Log in or Create an account to join the conversation.

Re:1959 Lake N' Sea Restoration 12 years 1 month ago #55398

  • Andgott
  • Andgott's Avatar Topic Author
  • Offline
  • Contributing Member
  • Contributing Member
  • Posts: 1243
  • Karma: 72
  • Thank you received: 0
Why is it that the sanding phase seems to never end??

I'm Many, MANY hours into sanding the transom, and I'm about 1/2 done-


Those louvers look cool, but I want to smack whoever decided to paint them, it makes sanding a real pain! There are two good layers of paint, and a lot of little nooks and crannies to get it out of. I've use all the tools I've got- Orbital sander, detail sander, and Dremel tool, all in an attempt to avoid the dreaded hand sanding... But, there are still some areas that I can't get to any other way.

Such a nice day, though- I think I need to go outside and work a bit more on the trailer...

-Andrew

Please Log in or Create an account to join the conversation.

Re:1959 Lake N' Sea Restoration 12 years 1 month ago #55400

  • 63 Sabre
  • 63 Sabre's Avatar
  • Offline
  • Contributing Member
  • Contributing Member
  • Posts: 4676
  • Karma: 147
  • Thank you received: 167
Seems when the temps get in the 30's it's time to roll up the shirt sleeves and do some things outside. I use old dental picks to dig in the nooks and cranies. Next time you go for a checkup/cleaning ask the person who does the work for some old tools. If you're a good sweet talker you can get a few..no charge.

Please Log in or Create an account to join the conversation.

Re:1959 Lake N' Sea Restoration 12 years 1 month ago #55403

  • stashm2
  • stashm2's Avatar
  • Offline
  • Contributing Member
  • Contributing Member
  • Posts: 666
  • Karma: 25
  • Thank you received: 1
Can you use a chemical stripper to loosen the paint there and a soft brass brush?

Please Log in or Create an account to join the conversation.

Re:1959 Lake N' Sea Restoration 12 years 1 month ago #55405

  • Andgott
  • Andgott's Avatar Topic Author
  • Offline
  • Contributing Member
  • Contributing Member
  • Posts: 1243
  • Karma: 72
  • Thank you received: 0
I am using Citri-Strip to loosen the paint first, It DOES get most of it off, but I still need to sand the Gel-Coat, and get those last 'bits' in the corners. The stripper saves a ton of time, though!

-Andrew

Please Log in or Create an account to join the conversation.

Re:1959 Lake N' Sea Restoration 12 years 1 month ago #55558

  • Andgott
  • Andgott's Avatar Topic Author
  • Offline
  • Contributing Member
  • Contributing Member
  • Posts: 1243
  • Karma: 72
  • Thank you received: 0
The sanding is more or less DONE- At least the 'removal' stage is. It's time to bring her up from the "dungeon" to the upstairs garage/workshop. My wheeled work stand comes in handy-


With those nice big "Turf" tires, I can wheel her out of the garage, over the grass to the driveway, up to the street, then down my other driveway to the main floor garage-


I use a trailer dolly under the front, so I can steer it. Being able to move the hull around like this, and even just when it's in the shop, makes life a LOT easier. I've got the deck on a similar stand as well.

Next comes filling the various gouges and cracks- Followed by, of course, MORE sanding, then a good coat of epoxy primer.... Then more filling (I'm sure I'll miss a spot or two that I'll catch once it's all primed!), then MORE sanding.....

I just LOVE sanding ;)

I'll get the hull painted, then flip her back over, then get the interior painted.

Her 'spot' in the basement workshop will be occupied by the '66 Ford soon. You guessed it- MORE sanding :)

-Andrew

Please Log in or Create an account to join the conversation.

Re:1959 Lake N' Sea Restoration 12 years 1 month ago #55560

Iam sure you know this, but after the first sanding on the primer
put a dust coat of black then sand ,it will show all the low spots
that still need attention

woosterken

Please Log in or Create an account to join the conversation.

Re:1959 Lake N' Sea Restoration 12 years 1 month ago #55615

  • Andgott
  • Andgott's Avatar Topic Author
  • Offline
  • Contributing Member
  • Contributing Member
  • Posts: 1243
  • Karma: 72
  • Thank you received: 0
Another great day, So I Pulled the hull out of the garage and filled all the various gouges and low spots-


The deeper ones are, I think, a result of trailering incidents, probably at the launch ramp... I reinforced them from the inside when the floor was out, and now filled them from the outside. Once it's all sanded and faired, You'll never even know it happened.

I got a little done on the dash and seats, too. Whenever I'm mixing up a batch of filler, I try to have a fe other projects handy, in case I have any leftover. They have numerous small gouges and holes that I need to fill.

I like being able to pull the boat out like this on nice days, It's MUCH more pleasant to work outside!

Please Log in or Create an account to join the conversation.

Re:1959 Lake N' Sea Restoration 12 years 1 month ago #55617

  • MarkS
  • MarkS's Avatar
  • Offline
  • Moderator
  • Moderator
  • Posts: 5348
  • Karma: 118
  • Thank you received: 5
Looks like you're making great progress up there Andrew! What kind of filler are you using, if you don't mind my asking?

Please Log in or Create an account to join the conversation.

Mark

Re:1959 Lake N' Sea Restoration 12 years 1 month ago #55625

  • Andgott
  • Andgott's Avatar Topic Author
  • Offline
  • Contributing Member
  • Contributing Member
  • Posts: 1243
  • Karma: 72
  • Thank you received: 0
MarkS wrote:

What kind of filler are you using, if you don't mind my asking?


Epoxy mixed with U.S. Composites fairing filler additive. It's a good blend of strength and easy sanding.

I mix it until it's about the consistency of frosting, just thick enough that it doesn't sag. It's got a nice long pot life, especially in cooler temps like these.

Please Log in or Create an account to join the conversation.

Re:1959 Lake N' Sea Restoration 12 years 1 month ago #55757

  • Andgott
  • Andgott's Avatar Topic Author
  • Offline
  • Contributing Member
  • Contributing Member
  • Posts: 1243
  • Karma: 72
  • Thank you received: 0
I got the bottom of the deck painted-


Now that the repairs are done on the bottom side, and it's all painted, it's time to flip it back over so I Can finish sanding, do some repairs here and there, and then get it ready for primer. Having the Gantry available for this kind of work makes it TOO easy-

Put some straps somewhere near the center, where the lift will be balanced, and LIFT-


Then, Flip it on the side- When it's balanced, it's super easy to do-

The weight of the deck is still on the strap/hoist...

Flip the strap over, and start lowering-
[img] And, drop it back on to the work stand- [img]http://www.agott.com/coppermine/albums/userpics/10001/0210Flipped.jpg

Then back to the 'hole' so I can work on it-


That took about 10 minutes total, working alone. SO much easier than any other method I've used. That is one of the best tool investments I've ever made!

Now- I get to start sanding again! Can you hear the excitement in my voice ??

-Andrew

Please Log in or Create an account to join the conversation.

Re:1959 Lake N' Sea Restoration 12 years 1 month ago #55777

Very nicely done, that gantry was a great investment in deed! I only hope my home built contraption will accomodate flipping the Century besides removing the v8.

Bob

Please Log in or Create an account to join the conversation.

Re:1959 Lake N' Sea Restoration 12 years 1 month ago #56124

  • Andgott
  • Andgott's Avatar Topic Author
  • Offline
  • Contributing Member
  • Contributing Member
  • Posts: 1243
  • Karma: 72
  • Thank you received: 0
More sanding... And MORE sanding... But I'm getting there. I put one last round of filler on the hull, I found a few spots that I had missed the first time. Hopefully that's all of them- I keep trying to remind myself that the only thing that is going to ever see the bottom of the hull is the fishes, and perhaps the occasional scuba diver. But, it will annoy ME if it's not perfect down there, even if no one else sees it.

I've got some filler on the deck now, too- There is going to be a lot of tedious filling and sanding to get all that ready for paint. But, that's half the fun :)

I should be ready to get some primer on the hull next week as well... I am going to order the hull paint along with the primer, and I am debating on color. I think that originally, it was a pure white- But I am thinking I might use a slightly off white color, like Hatteras White, rather than a pure white, I think it might look good with the pink decks. I'm just not sure... I could paint the louvers pure white then, to make them really stand out.

I am really looking forward to getting this sanding part behind me :)

-Andrew

Please Log in or Create an account to join the conversation.

Re:1959 Lake N' Sea Restoration 12 years 1 month ago #56126

Andrew, you definitely have the right set up.

Please Log in or Create an account to join the conversation.

Todd (aka thetudor)
1964 Custom Craft Aqua Ray
1959 Glastron Seaflite
1959 Tomahawk Spirit

Re:1959 Lake N' Sea Restoration 12 years 1 month ago #56523

  • Andgott
  • Andgott's Avatar Topic Author
  • Offline
  • Contributing Member
  • Contributing Member
  • Posts: 1243
  • Karma: 72
  • Thank you received: 0
Fill... Sand. Fill... Sand....

Progress has been steady, but frustrating! The Gel coat and first layer of 'glass on this boat were pretty shoddily done when it was built- there were a LOT of bubbles and voids in the gel, so when I sanded it, I had to go all the way down to bare 'glass in most places... There were quite a few voids and bubbles in the first layer of cloth used in the layup as well. So, After sanding the decks down, I've been going over everything inch by inch, filling any problem areas, and sanding them down. I did three 'passes'- Every time I'd find something that I missed the time before. I THINK i've got it all now- Or most of it, anyway!

Before I sanded the gel off, the fins had nice, sharply defined edges... So I repaired them with some filler, and reshaped them-


I THINK that the deck is ready for primer... If course, I'll probably find more pinholes next time I go over it, but there is a point where you just have to call it good enough :)

The hull is ready to go now, too. That transom is a pain- But I got it all done, filled, and sanded. The louvers look cool, but they are no fun to work on !

The paint and primer have been ordered. I decided NOT to use the cream/off white- I am using the pure white, which is 'original'. I have chosen a two-Part urethane that's made by the same company as the single part that I used on the Glasspar. I'm also using their high build primer. Hopefully we'll get some great weather next week so I can get some spraying done.\

-Andrew

Please Log in or Create an account to join the conversation.

Re:1959 Lake N' Sea Restoration 12 years 1 month ago #56573

looking good andrew,i know what you mean about sanding,john

Please Log in or Create an account to join the conversation.

\"too soon old,too late smart\" my pap

Twenty years from now you will be more disappointed by the things that you didn’t do than by the ones you did do. So throw off the bowlines. Sail away from the safe harbor. Catch the trade winds in your sails. Explore. Dream. Discover.“

---Mark Twain

Re:1959 Lake N' Sea Restoration 12 years 3 weeks ago #57023

  • 63 Sabre
  • 63 Sabre's Avatar
  • Offline
  • Contributing Member
  • Contributing Member
  • Posts: 4676
  • Karma: 147
  • Thank you received: 167
Andrew, don't forget to sand and fill the pit holes

The cold weather is giving me a break from that never ending task for now. A good high build primer will fill lots of the smaller ones for you.
Great project, I look forward to seeing your progress.
Attachments:

Please Log in or Create an account to join the conversation.

Re:1959 Lake N' Sea Restoration 12 years 3 weeks ago #57030

  • Andgott
  • Andgott's Avatar Topic Author
  • Offline
  • Contributing Member
  • Contributing Member
  • Posts: 1243
  • Karma: 72
  • Thank you received: 0
A beautiful day here- Perfect painting weather! I got the first coat of primer on the hull & deck-


It is starting to look more like a boat and less like a project.

I sprayed this primer- It is a high build primer, and gave me some trouble spraying, I think if I had it to do again I'd just use a foam roller! The next coat will probably get rolled... My equipment clogs too easily with a paint this heavy, and I didn't want to thin it too much.

I didn't spray them in the front yard- I sprayed in the garage, then pulled them out. This stuff dries FAST (less than 1/2 hour!) So, I had to keep going... Since it dries fast, I didn't have to worry about bugs and dirt getting in to it out there.

Having it all one uniform color like this really helps to find all the flaws... Looks like I'll be doing some sanding :)

It wont be long before I'm squirting color- I better decide on a shade of pink.

-Andrew

Please Log in or Create an account to join the conversation.

Time to create page: 0.347 seconds

Donate

Please consider supporting our efforts.

FG Login

Glassified Ads

1975 16ft Cobalt
( / Boats)

1975 16ft Cobalt
03-27-2024

Homelie/Bearcat
( / Engines)

noimage
03-17-2024

Thunderbird Apache 1956 hardtop
( / Boats)

noimage
03-10-2024

FiberGoogle

Who's Online

We have 7592 guests and one member online