Welcome, Guest
Username: Password: Remember me
  • Page:
  • 1

TOPIC: G-3 project photos

G-3 project photos 10 years 3 months ago #88229

A couple photos of my "new-to-me" used G-3
Attachments:

Please Log in or Create an account to join the conversation.

Re:G-3 project photos 10 years 3 months ago #88230

The transom is rotten out.
Attachments:

Please Log in or Create an account to join the conversation.

Re:G-3 project photos 10 years 3 months ago #88232

Another view of the rotten transom. The wood is really bad and much of it is gone. About 2/3 of the inner fiberglass fiberglass skin is peeled down or is just gone.
Attachments:

Please Log in or Create an account to join the conversation.

Re:G-3 project photos 10 years 3 months ago #88233

The outer fiberglass skin is cracked/torn/"a mess" at the transom. Plus, the deck attachment to the transom is gone.

Please Log in or Create an account to join the conversation.

Re:G-3 project photos 10 years 3 months ago #88255

Lots of tight, small cracks in all of the fiberglass deck.

Please Log in or Create an account to join the conversation.

Re:G-3 project photos 10 years 3 months ago #88262

  • dspeck
  • Offline
  • Junior Boarder
  • Junior Boarder
  • Posts: 62
  • Karma: 4
  • Thank you received: 0
Looks a lot like mine at the transom (hopefully the file uploaded.) If you haven't done one of these before, I have a couple of suggestions. First, get a cheap 4.5 inch angle grinder from Harbor Freight for about $12. Buy the 2 year free replacement warranty and a diamond wheel (also Harbor Freight) for grinding concrete. The wheel will quickly do the heavy fiberglass and resin removal (although it vibrates pretty hard) but will be hard on the grinder. If it fails (mine did) Harbor Freight will replace it free if you have the warranty. Second, remove the transom wood but try to keep the outside fiberglass skin in tact. I learned this from an article in the archive by a guy who replaced the transom in under a week. I think it's much easier than cutting out the glass and having to blend new glass into the sides. It also gives you an easy to follow template for the replacement wood.

Hope this helps. Good luck and have fun.
Attachments:

Please Log in or Create an account to join the conversation.

Re:G-3 project photos 10 years 3 months ago #88272

Wood is a good way to go, but anyone ever do one of these?

www.invisionboatworks.com/seacast.html

Please Log in or Create an account to join the conversation.

Re:G-3 project photos 10 years 3 months ago #88275

Chris:

Thanks for posting the pictures of your G-3 project.

I don't know much about that product you posted but the other members will be able to help you.

Please Log in or Create an account to join the conversation.

Re:G-3 project photos 10 years 3 months ago #88283

I have a buddy that did his Evinrude Gullwing boat transom with that stuff and swears by it. Just thinking about it. Anyone else.

Please Log in or Create an account to join the conversation.

Re:G-3 project photos 10 years 3 months ago #88284

Seacast has been used very successfully in a lot of projects, but since the inner fiberglass is damaged/missing in this boat it may be just as easy and somewhat lighter to replace with plywood. I have always found that the removal of the old transom wood is the biggest part of the job. Once that is done, putting in replacement wood is not too bad.

On a G3 it may be worthwhile since I thought someone mentioned they have a curved transom?

Bernie

Please Log in or Create an account to join the conversation.

Re:G-3 project photos 10 years 3 months ago #88289

One of the best feature of a G-3 is that the boat curves on every one of it's surfaces.

Even the cockpit floor, which is fairly flat, tapers and has to be fitted.

Please Log in or Create an account to join the conversation.

Re:G-3 project photos 10 years 3 months ago #88290

I think the curve on the G-3 transom is 15 degrees.

Chris, I think I still have some of the old "Airguide" Gauges
(speedometer and tachometer) that came with our 1960 Seafair Sedan.
If you want them for your G-3 you are welcome to them Sir! As you know, I have all new "Mercury" Gauges in both our G-3 and the
Seafair Sedan.

Please Log in or Create an account to join the conversation.

Re:G-3 project photos 10 years 3 months ago #88293

Thanks for the offer! Very generous of you. Hope to see you, your bride, and your G-3 at the June, St. Michaels Classic fiberglass and wood boat show for 2014.

Please Log in or Create an account to join the conversation.

Re:G-3 project photos 10 years 3 months ago #88303

Anyone ever see a G-3 using two buckets in a sort of "Restomod" boat rather than a correct restoration G-3.

Please Log in or Create an account to join the conversation.

Re:G-3 project photos 10 years 3 months ago #88307

seabuddy wrote:

Thanks for the offer! Very generous of you. Hope to see you, your bride, and your G-3 at the June, St. Michaels Classic fiberglass and wood boat show for 2014.


Your very welcome Chris!

We are going to try real hard to make your St. Michaels Show this year with our G-3 as I told you at our Falls Lake Event last year.

Please Log in or Create an account to join the conversation.

Re:G-3 project photos 10 years 3 months ago #88315

Another photo.
Attachments:

Please Log in or Create an account to join the conversation.

Re:G-3 project photos 10 years 3 months ago #88318

Hi John,

In regard to the transom curve, this is what I got from Doc Frankenmerc:

The curve is 186-1/2 radius

Oldskier,

The curved transom is made up of laminated 3/8" sheets of plywood. Being only 3/8" they flex pretty well, so what I did was glue them in one sheet at a time, clamp and let set. The stock G3 transom is 4 sheets thick. I, and other that I know have used 5 layers... which leaves you with a transom that is just over 2" thick when you count the outer hull and inner glass skin.

Cheers!
Dean :)
Attachments:

Please Log in or Create an account to join the conversation.

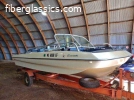
Bandit - 1959 Glasspar G3
See more G3s at www.g3owners.com

Re:G-3 project photos 10 years 3 months ago #88323

Dean, I have seen the process of building a curved transom somewhere on here. I wish I had a G3 to apply the principle to. Then I would need to track down a short shaft inline 6 Merc and find a way to convince the Admiral why I need another derelict boat in the yard.....

Thanks, Bernie

Please Log in or Create an account to join the conversation.

Re:G-3 project photos 10 years 3 months ago #88328

This one makes me think I am 14 again.

The radius in the drawing is looking down at the boat?

Please Log in or Create an account to join the conversation.

Re:G-3 project photos 10 years 3 months ago #88377

Correct, this is a plan view (from above) of a horizontal level, between the two 'points' of the sponsons.

Dimensioned drawings are available of the bench seat plywood patterns – do you have these yet? I can find them if you want. Bucket seats are fine for the open cockpit but I think benches are preferable in the centredeck version.
The centre deck and its vertical support have an advantage of adding rigidity to the boat as does the splash well tray when securely affixed.
Enjoy your rest.
Ken

Please Log in or Create an account to join the conversation.

Re:G-3 project photos 10 years 3 months ago #88379

I want the center deck and agree that it adds stiffness to the boat. Still up in the air about the buckets vs. bench.

Please Log in or Create an account to join the conversation.

  • Page:
  • 1
Time to create page: 0.323 seconds

Donate

Please consider supporting our efforts.

FG Login

Glassified Ads

FiberGoogle

Who's Online

We have 7315 guests and one member online